My New Blog: TF Workshop

Saturday, December 30, 2006

Drawer Construction Continued...

All the boxes (21 of them) for the wall cabinets are ready for final assembly tomorrow. These are for the drawers and pull out shelves.

Since we are building the cabinets ourselves, we decided that every shelf below 4 feet is going to be pull-out. The extra labor will be worth it in the long term. Its about $20 for materials per pull-out shelf, including the full-extension slides.


I have 3/8" pre-finshed maple plywood from Shurway Building Center for the bottoms of each of these. There are a couple of shelves that will hold plates - on those I will use 1/2 inch.

We will need to do this all over again for the island and hutch later in January.

Thursday, December 28, 2006

Kitchen Windows & Bump Out

The windows were installed a few weeks ago, and I need to catch up on the logging the costs.

Here is the bump out we finally decided on, which still needs to be trimmed out and painted. This adds an additional 2.5" depth, giving 7" for the final sill. This will accommodate the pots for the garden window. I will also add a shelf half way up.


Comparing this option with a pre-fab unit

Pre-fab estimates:

  • Unit cost $800 from HD
  • Window trim $20
  • Total Cost: $820

Bump-out:

  • Window cost $156 from HD
  • Window trim $20
  • Framing lumber $30 (it's really cheap right now)
  • Piece of T-1-11 ply $35
  • Final trim $40
  • I already needed to paint, since I added other siding - a quart would be $20
  • Total Cost: $300
The total cost of windows was this one, plus the other west-facing one that was a simple install. It was another $156 plus $20 for trim, giving a grand total of $480.

So which looks better? It's on the back of the house, so its really not that big of a deal. For me, I prefer the bump-out. I think it fits better into the overall style of the house. We are going to add an exterior window box as well, which would not be possible with the pre-fab unit.

Having the cost at $500 less is another factor. In this case the window fit up under an existing roof overhang. If we would have added another one on the west side, I would add another $100 for cost of putting in a little roof and flashing.

Wednesday, December 27, 2006

Building Drawers Boxes

I finally decided to make the drawer sides out of laminated pine. I planned on using plywood, but didn't want to go through the work of edge banding all the pieces. Also, if they get damaged (we have 4 kids...), the ply shows through.

I bought the pine at Home Depot at $12 for a 18" x 48" x 5/8" piece. The drawers took 8 pieces so far. I think I will need about 12 more pieces for the island drawers and all the pull out shelves. I'll tally the costs once complete.

Here are all the rough cut pieces:


Process steps to get drawer parts:
  • Cut the pieces to width and length plus at least an inch
  • Use a jointer to plane off the saw marks
  • Route 1/8 round-overs on all for corners (along the length)
  • Use dado blade to cut in the recess for the drawer bottom
  • Cut the pieces to final length
  • Drill holes for assembly screws
  • Sand with 220 grit
Below are a couple of pictures of the the drawer assembly table I use. It allows me to clamp the drawer parts while screwing them together.


I used 1 5/8" sheetrock screws and a good bead of wood glue on the corners. I found that lubricating the screws before driving them makes a big difference. They go in much smoother and rarely strip. I have used liquid soap, Carmex, and grease - and all work well. This time, I tried dipping the tip of the screws in polyurethane glue, which also allowed for easy driving. I am assuming this will bond the screws in place as an added bonus.

I used the acbinet face-frame stain for the drawers to match the cherry. It looks a bit different on the pine, but should blend in well. My simple drying rack is a rope tied across the garage. The hooks are peices of 12 gage wire with a twisted loop on one end and wrapped around the rope on the other.

Once the stain is fully dry (tomorrow), I will spray these with three coats of polycrylic, lightly sanding in between.

Monday, December 25, 2006

Pull out Garbage Can Modified and Installed

Well, this is not exactly the most exciting post ever published... I finally got the pull-out garbage can to fit under the sink and work properly. The problem was that it was a bit too tall to fit.

First, I was able to lower the entire assembly by 3/8 of an inch by taking it apart, re-drilling the support holes, moving the screws and grinding the excess off. Lucky I am not getting paid for my effort - I would be getting 25 cents an hour at most.

Second, I rerouted the drain plumbing to the back of the cabinet, as shown.

I read about this technique in a magazine, and I have done our bathroom this way as well. It gives you a whole lot more usable cabinet space under the sink. The trap is hinding behind the disposal. I made sure the long drain pipe from the right sink has good downward pitch. Also, the pre-finished maple plywood shown, along with the poly glued joints, make a very water-resistant cabinet.

To deal with the last 1/4 inch of interference, I ground the back of the garbage can down about 3/4 of an inch.

After all this work, I have to admit I am happy with the result. Everything just fits, and gives my DW the most storage space under there.

Final tip: I did not mount the slide assemblies directly to the cabinet bottom. I put a washer between the wood and the brackets where each screw went in. This gives about 1/16 inch space, so if water does get down there, it will help it dry out faster.

Friday, December 15, 2006

Taking a break and catching up on some reading

Like many of you, I am taking a break from remodeling to enjoy Christmas and the holidays. In the mean time, I am reading through a couple of favorite books on home design:

In general Architecture Week is a very good site for ideas - light on ads and fluff, heavy on ideas and content.


A great place to start is their library page: http://www.architectureweek.com/library.html

Wednesday, December 13, 2006

I started a parent site: Greengate Ranch Remodel


When I started the 10K Kitchen Remodel blog, I really had no idea that other people blogged about the work they did on their homes, houseblogs.net, etc. I quickly came to find out that I am one of the many, not the few.

We purchased our current house to remodel it into what we wanted. The location and land were really what we were looking for, but to get that, we needed to by an older home that was not part of the new developments. If you know the Portland, Oregon area, you know that new homes come on lots the size of a manhole cover.

I will keep up this blog, since it is very specific with planning, costs, suppliers, etc., and continue to build my new one, covering our work on the whole house.

Sunday, December 10, 2006

Trouble with pull-out garbage can

We bought a pull out garbage can from The Container Store - and its about an inch too tall!

I had to move the garbage disposal to the deeper sink, and try to mount the can on the shallow side. Once I started measuring the space against available products, I realized that I would have to do this no matter what.

I made the drain pipe take an immediate out of the sink strainer and moved the trap to the back, and I still have about 1/2 an inch to go. Next I am going to take the metal assembly apart - I figure I can get about 5/8 of an inch by re-drilling the holes, etc. If all else fails, I will cut a little bit off the back of the plastic lip, which I really don't want to do. I am glad that most of the things we are doing don't take this much fiddling... The cost was $49.

In addition to this, we also bought an under-sink wire slide-out organizer for $59.

Total cost $108.

Saturday, December 02, 2006

Break in Holland

I am working in the Neatherlands (Eindhoven) for the next week, so I get a break from the remodel work. I am glad to get a rest from the kitchen, but also anxious to continue the momentum. Once I got the sink in and the water running, I needed to travel.

My DW put plastic down on the plywood countertop base and started using the kitchen. She is really a trooper about the remodel, expertly handling the the dust, dirt and general chaos.

Since I come over here regularly, we have been trying to find antique chocolate molds, waffel irons, etc. to display on the open wall and soffit shelf we are putting in.


Wednesday, November 29, 2006

Garbage Disposal: $130

I am catching up with the logging on the costs for the "10K kitchen remodel"...

We choose the Insinkerator 444. It is 3/4 HP and sound insulated, all for $130 as a special buy at HD. The online prices are $129 to $179 plus shipping, so HD was a good way to go.
The installation was nothing but simple: A snap-ring, 3 support bolts, mount the thing and twist tight. The only down side, it didn't come with a power cord, so a heavy-duty power-strip got canniblized (yes, it was 12 gage wire).

So far so good, its running like a champ.

Cost of Granite

We are hoping to install about 65 sq ft of granite counter for under $1500.

The tan-brown granite tiles are 26 1/2 by 18 inches and cost $20 a sf from Tile for Less. Total cost for 20 tiles was $1256.

Since the tiles come with 1/4 round-over, polished ends, we only needed to get the sink and island edges ground and polished. Crowley's Tile Edging did the work for $230, which I thought was really reasonable. It was $15 per foot for round edges and $10 for flat. The edging will end up looking like the the image below.


We will use epoxy grout, costing about $25.

Cost roll-up: $1510

The Glue Worked!

This is a follow-up to my last post... The polyurethane glue worked great for setting the granite composite sink. It expanded, filled all the open gaps between the supports and the sink flange, and became rigid - that thing is going nowhere. You have got to clamp the sink down though, the expanding glue will lift it up.

We installed the drains, garbage disposal and faucet, and it is holding well. I will not be able to put the granite down for about a week and a half due to travel for work.

Monday, November 27, 2006

Better Living Through Chemistry (Polyurethane Glue)

I figured out how to get the granite sink level with the base of the new counter top. The method was a variation on a couple of posted comments.

The sink rim thickness varied a bit, say 10%, and it was not exactly flat. I cut out a 1/2 inch wide recess for the rim that was about 1/8 of an inch deeper than required. When I set the sink in place, it was exactly right in a couple of spots, and low in others. I shimmed the corners to be flush with the top, leaving a zero to 1/8 gap between the cutout and the sink.

After shimming, I removed the sink, making sure to keep the shims in the right spot (a little wood glue on hte bottom side of hte shims made them tacky). I put a generous amount of polyurethane glue all around the recess and set the sink back in place and clamped it. As the glue dried, it expanded up to about 4 times its original volume and filled the voids. Now the sink is fully supported and glued solidly in place. The variation is now zero to about 1/16 below the plywood, which is perfect for taking the granite tiles.

I am leaving it clamped over night to make sure everything stays solid. If there are slight positive spots, I will sand them down where the granite overlays.

Sunday, November 26, 2006

Appliances Went In

Today was finally that really productive day I have been looking for. The kitchen is starting to look more and more like the design image (see right sidebar), which is really encouraging.
  • Finished installing the cabinets boxes
  • Put in the plywood base for the granite counter tops
  • Installed the windows, including building a small bump-out to make the sill deeper on the left one.
  • Got the appliance in and working (why don't they provide power cords with ovens and dishwashers?). We are really happy with the black finish.

I have been waiting for the weather to break for about a week, but most there has been rain. I decided that I needed to get the new windows in anyway - I need to go back to work tomorrow. The rain basically stopped as I walked out to get the ladder, and did not start again for about 3 hours!

I hoped to get the sink set, but I ran out of time. I am undermounting it beneith the granite tiles, so I need to get it exactly flush with the plywood base. The rim of the composite sink has some variation in its thickness, so I need to individually shim it in about 14 places. I need to figure out a way that this won't take a week to complete.

Saturday, November 25, 2006

Cabinet Install & Kick-plate Drawers

We installed most of the cabinets today, getting about 80% complete. I plan on finshing them off in the morning and getting the base of the counter top in. The soffits lined up pretty much exactly as planned.

Notice under the some of the cabinets there are open spaces - these are for the kick plate drawers.


Here are the base assemblies, made of 2x4. We mounted full extension drawer slides to the interiors.


We want to make these drawers as wide as possible. Where the drawer is wider than a single cabinet, I supported the them with a piece of steel channel underneith. These are glued with polyurathane and screwed in place.

Progress through Friday

We completed the texture, painting, wiring, hood venting and close-in. We are not texturing & painting the area below the soffits, since it will all be tiled using backer board. It only needs to be taped and mudded once.

A little bit of a disaster occured when I drilled through the power line to the oven (40 amp) by mistake. It vaporized the end of the bit, and of course ruined the cable. There was really no option to try to repair it, since it was aluminum and three wire. I needed to pull it out and 3 hours + $100 later, we had a new cable. The up side is now we have a 8 gage copper 4-wire cable, which is the new code.

I will refer back to a previous post - the low profile drill was a life saver for this. I needed to drill a new hole down from the attic through the soffit, where the roof comes down. I had to lay on my stomach and reach in where I had less than a foot of clearance. There is not way a regular drill would have fit. That little tool and a spade bit bored the hole in seconds.


To texture, I use a sprayer powered by my air compressor, called a "spraying mantis". Its about $75, and overall a great tool for DIY sheetrock.

Today we finally install the windows (hopefully the rain will continue to break), and start on the cabinets.


Wednesday, November 22, 2006

Half way through "vacation" week

Right up front: I am never satisfied with my progress on projects, and I always want to be ahead of where I am at. That being said, things are moving along.

What we accomplished today:

  • Picked up windows. Did not get them installed - it rained hard all day.
  • Tore out all the cabinets, removed applianced and cleaned them.
  • Finished mudding, sanding and texturing the soffits. Not yet dry enough to paint.
  • Completed moving the plumbing supply and drain lines over about 14 inches to the new sink location. The sink drain is 2 inches, and now the distance to the vent is just under 3 feet - well within the critical distance requirement of 5 feet.
  • Traced out all the circuits and opened up the wall to move and add outlets & switches.
The most frustrating part of the day was driving to HD and Lowes to get stuff. The pre-holiday traffic was terrible. Friday will likely be worse! I am staying home...


Tuesday, November 21, 2006

Tuesday's Output

All in all, we had a good day and got a lot accomplished.

The granite fabricators took only one working day to finish the edging work, charged me $50 less than I was expecting, and were very friendly - I was really impressed. I will put the details in another post detailing granite costs.

I went to HD to see if my windows came in, since we now have open holes. They told me the delivery date was pushed out to the 26th, so we plugged the rough openings with foam board. They then called and said they just came in! So I will get them in the morning and install them.

What we accomplished today:

  • Took out old windows, modified rough openings to go from 60 to 48 inches wide (to allow for more upper cabinets), fixed siding
  • Tore out about 1/3 of the cabinets to get to right window - this window is on the second floor of the house, and we wanted to do as much as possible form the inside.
  • Sanded soffits and put second coat of mud up.
  • Picked up granite pieces from the fabricator.
  • Removed all cabinets doors and drawer fronts for re-use. Completed installing all drawer and shelf slides
  • Oh yeah, cleaned the gutters since they we overflowing with rain...


Goals for tomorrow:

  • Install windows, including framing the bump-out for garden window.
  • Finish soffits, get them textured, maybe PVA primed.
  • Tear out the remainder of the cabinets
  • Add a few outlets
  • Move supply and drain plumbing over about 12 inches
  • Strech goal is to paint soffits and start installing cabinets

Monday, November 20, 2006

Wall work

We are spending Monday and Tuesday doing all the "wall work": modifying the soffits, resizing the window openings and adding can lights.

We decided to keep the soffits and put a display shelf along them. Since the upper and full height cabinets are a couple of inches deeper than standard, we needed to extend them. Also we have the new double-oven cabinet, so that soffit was added (left side of picture).

The pictures below show the progression of this afternoon's work: framing, sheetrocking, and taping. I will tear out the (and throw away) the uppers tomorrow.


Sunday, November 19, 2006

KItchen lighting plan

I finally decided on the lighting plan.

After looking at way too many web sites, I gathered enough information to put it together. I guess I could have just looked at a few kitchen pictures, but I wanted to create it from design rules. I found there are a lot of differing opinions on what those "rules" are.

Here is the plan using 5" recessed and T5 flourecents. (the 4" note should be 5")


These are the "rules" I came up with:

Recessed lighting:

  • Use 4" for task areas only - these are expensive and the trim options are limited
  • Use 5" for general lighting if the room is smaller in size or has less than 9 ft ceilings. We went with these.
  • Use 6" for larger rooms with higher ceilings
  • The size of the can does not indicated how much light you will get - the wattage of the bulb does.
  • In general, you need between 2.5 to 3 watts of light per square foot. Here is the math for our kitchen:

11 x 17 = 189 sq ft

189 sf * 2.75 watts per sf = 561 watts (between 2.5 and 3)

514 watts / 65 watt bulbs = 7.9 bulbs --> 8 lights in the ceiling

  • You should set up the parimeter lighting about 18 inches from the upper cabinets

Under cabinet:

  • Mount the lights close to front of the cabinet
  • Lots of options, went with flourecent due to heat of halogen or xenon

Saturday, November 18, 2006

Granite layout, cutting, gluing, testing...

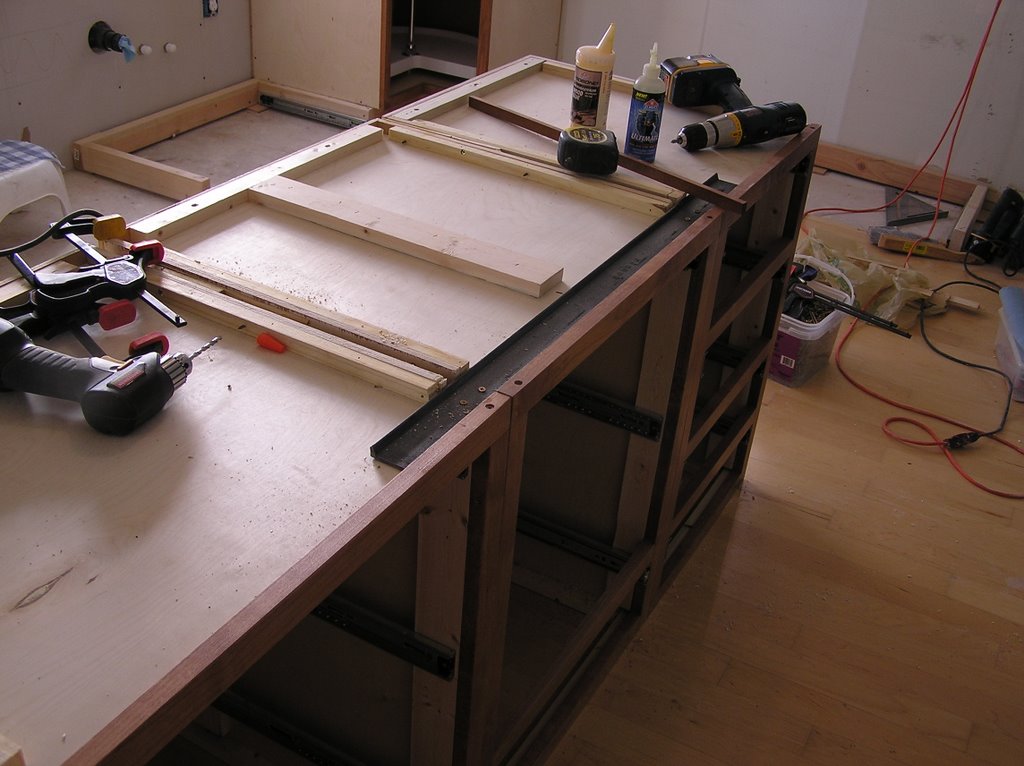
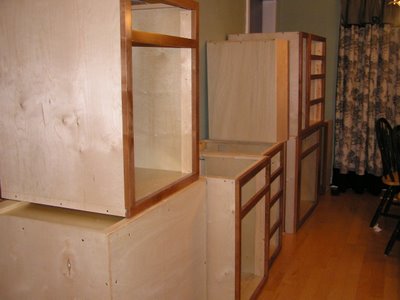
I needed to take a quick break from the cabinets to get a few cut pieces over to the fabricator to put finshed edges on them. These are for the drop-in sink and the island. Delivery time is about 3 days, and I would really like to have them before the Thanksgiving weekend.


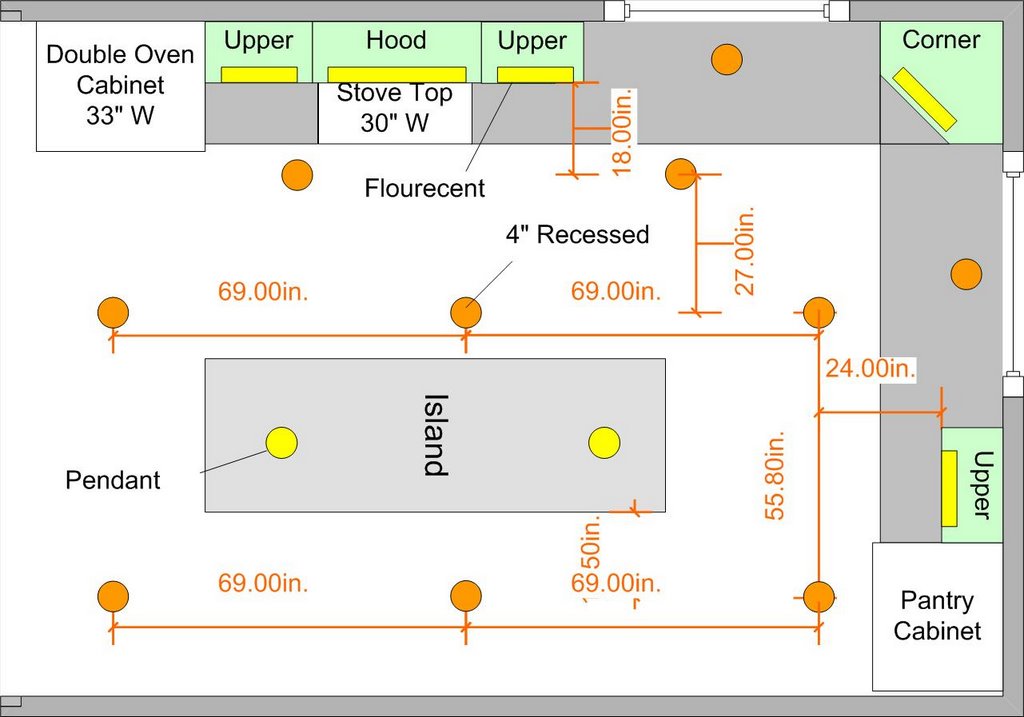
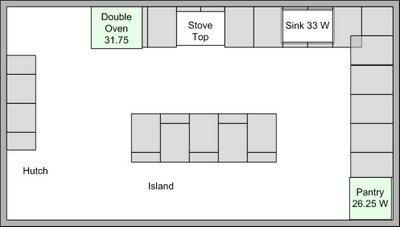
Here is the granite layout plan:


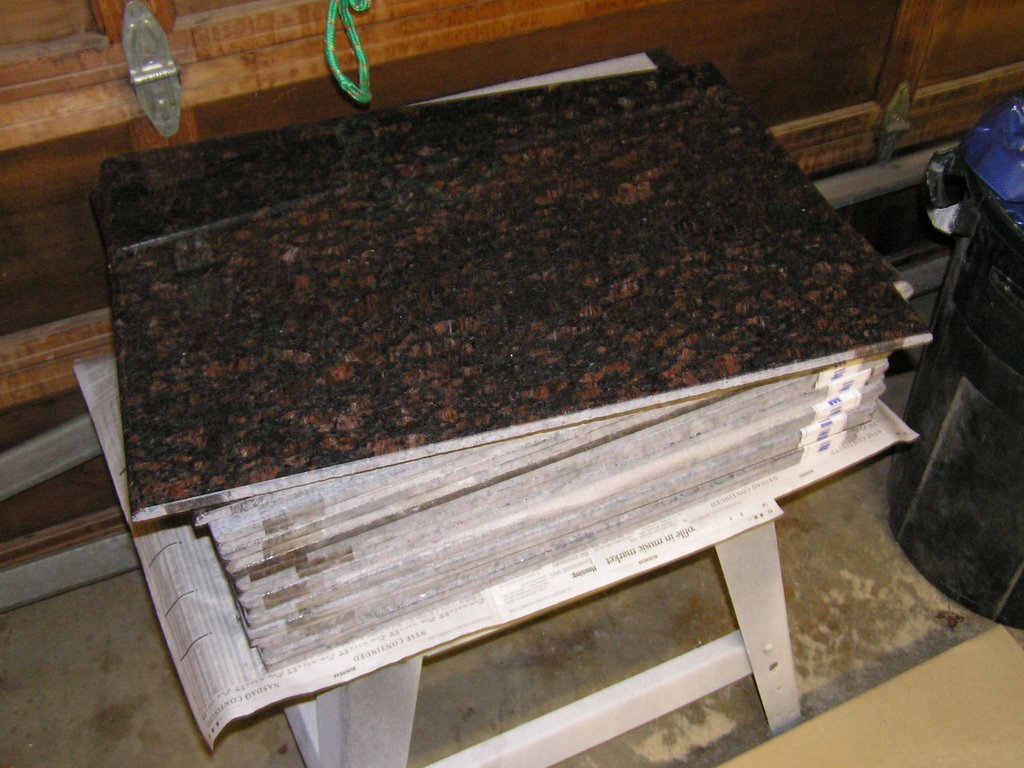
I decided not to try to cut the large tiles on my tile saw - it's too risky. The granite between the blade and the fence would likely crack. At $66 a piece I really didn't want that to happen. I bought a 4" skill saw for tile from HD for $45 (Workforce THD250). The saw worked great - really clean cuts. I cut the sink pieces 1/4 large and then re-cut them on my tile table saw, to get them exact.

I am planning in using polyurathane glue to install the granite. I have used it on tile and slate, and it worked really well. I have installed a fair amount of tile and lots of brick and stone (used to work in masonry), so working with morter and thinset is not an issue. I want to bond the granite directly to the wood, so I dont have to add the 1/2 thickness needed for backerboard and two layers of morter. Also, the poly will bond the granite diretly to the undermount sink, and give good water proof seal. Finally, the poly has an "open time" of at least an hour, giving me the chance to make sure everything is exactly right.

So I did a couple of tests... I bought some cheap pink granite and setup prototypes (yup, I'm an engineer). I tested the bonding strength of granite to plywood and granite edging.


Both work excellent.

I spread the glue on about 1" lines on the plywood. This glue foams up, so it needs some place to go, or it will raise the tile. I let it dry about 8 hours. I broke off the granite edge with a hammer both in the upward and downward directions. In both cases it broke at the glue line - in other words, the glue bond is stronger than the granite itself.

For the edge glue, I tried to break it by hand - no go. I can't break it. I have done a lot of edge bonding like this with thinset - it breaks pretty easily. This is definately a superior bond. I am going to back-up the edge bonding with a piece 3/4 x 1 wood, glued in place.

I will bond the edging to the tile before install. This way I can get them exactly right, and not depend on the face of the cabinet to align them. If you notice a poor tile job, it often is due to the front edging not being quite right.

Friday, November 17, 2006

A plug for "Tile for Less"

I purchased the granite shown on my previous post from Tile for Less in Beaverton, Oregon.

I can't say enough good things about these guys. Their prices are reasonable, selection is good and service is great. They are willing to take time with you to discuss your project and help you think about various options. I wanted to switch some tile to a different color for accent - no problem (I can't imagine doing that at HD).

I dont know if the other stores (there are a number of them in the west) have this same level of service, but my guess is that they are worth looking into.

Here are some pictures of our bath we remodeled last year - we put 200 sq ft of porcelain tile in there.


Thursday, November 16, 2006

It's almost D-day

D is for demolition!

I have almost all the wall cabinets stacked up in the dining room, waiting to go in. I need to complete the pantry and double-oven cabinet.


I am taking next week off to try to get the old kitchen out and the main parts of the new one in. The plan is to finish all the cabinet details on Saturday, spend Sunday planning and running to HD for bits, and start full blast on Monday.

I am anticipating about 6 full days of work to get the old one out and the basic parts of the new one in, including windows and granite.

Here are the granite "tiles" I am using - its tan-brown:


These are large 18 wide by 26.5 deep, with 1/4 rounded front and back edges. They are made for counter installs, giving a minimum number of joints. I like these as a much cheaper option than slab granite, but with a lot less joints than 12x12 tiles. If I went with 12x12 with either a pre-fabricated front edge, or had the tiles edged, it still would come in at around $20 a sq ft. I am also planning to use epoxy grout, with is totally water and stain proof, and keep the joints to 1/8 inch.

I needed to buy 20 of them for a total of about 66 sq feet. The cost was $20 a square foot, which I think is a really reasonable total of $1325. I need to get a few edges rounded and polished by a local fabricator - he charges $14 a foot. I will put the total for the tile cost in the running cost update once get the fabrication done.

My only challenge is to figure out how to cut these. I have a mid-sized water saw for tile, which ought to work fine once I set up some sort of support for the 26 inch width.

Sunday, November 12, 2006

New cool tool

I just got a new tool - a craftsman professional series close quarters drill. It is definately going to become one of my favorties. I bought it for tight spaces, and I was surprised by the ergonomic improvement over regular drills. I really like being able to get my hand closer to where I am driving screws.

I bought a corded version on purpose: having a large battery hanging off the bottom can somewhat defeat the "close quarters" feature. This will be great for mounting cabinets and drilling holes for wiring.

The downside is the price being at $140. It was a birthday present...

Here is a product review link from Fine woodworking

Saturday, November 11, 2006

Change of Plan - Bumping out the new windows

We were doing the final measurements for the two new windows, and my DW decided she would really like a garden window on the south wall.

The "off the shelf" garden windows at HD are $500, but they are only 3 feet high, which will not look very good. We were planning on 42 inches, not 36. HD can get me a special order one for a little over $800. The best online price with shipping is over $1,000. A good quality regular window in a custom size (48W x 42H) is about $175. So here is what we are going to do...

After an hour of dreaming and scheming, we decided to do bumped-out windows on both the south and west sides. This will improve the exteror of the house, plus it will allow my DW to have all the window gardening space she would ever want. One spot will be heavy sun (well, at least heavy for western Oregon), and the other with sun only 1/2 the day.

I still need to do the final design of these, but here is what I have so far:
  • Bump out the wall by 6 inches (2x6 + plywood), giving about a 10 inch sill
  • Go with 48W x 42H for both windows
  • Add wire shelves 1/2 way up
  • Build out the exterior so it adds to the appearance to the house - see below
So rather than a about $1100 for one garden and one regular window with trim:
  • 2 regular windows - $350
  • Framing lumber - $150
  • Siding - $100
  • Flashing, roofing, insulation, trim etc. - $200
Total estimate of $800


I did some searching on the web for exterior bump-out ideas...

This one adds to the architecural quality of the house - it has structure and an appropriate amount of mass. I think it makes a nice focal point for the front.


I think this one is horrifying - sorry if it's yours! It has only one purpose, deepen the sill. I am sure from inside it looks great, and this is likey on a hidden section of the house. Some mass around it would add a lot. This is also why I don't like exterior look of garden windows.


We have decided to not do a whole lot on the exterior of the house until the inside is done, but this will be an exception.

Thursday, November 09, 2006

Deadlines...

I put myself on a schedule for this kitchen remodel, hoping to have it done by Thanksgiving - and have people over. It is not likely going to happen. Vacations, kids, work, sickness, and life got in the way a little bit. I also volunteered to make two coffins (yup, coffins) for a haunted house out of OSB.

I haven't lost all hope yet (I'm a perennial optimist). I should have all the wall cabinets done on time, and I am taking the full week of Thanksgiving off to get a whole lot done. I have started stacking completed cabinets along a wall in the kitchen, so the anticipation is growing.


A bit of detail on the cabinet design: I have 1x3 (actually 3/4 x 2 1/2) strips running down the side-walls. These will allow the drawer and shelf slides to be flush with the face frame edges. An added benefit is that the cabinets are now ultra-stout, and will easily support the granite tops.

Kohler Vinnata Kitchen Faucet

We decided on a Kohler Vinnata facet in brushed nickel. This is one of the "high end" items that we decided to fit into the budget. It has a classic look with the pull-out feature.

It cost $350 plus $30 shipping from the ebay store "The Plumber's Crack". I am not very impressed with the seller's store name, but the price and service were great. It arrived 2 days after we paid for it. Other online stores sold it for $400 to $500. It retails for about $540.

Tuesday, October 17, 2006

Base Cabinets

I completed the basic boxes for base cabinets - the assembly went pretty much as planned.

The 1/2 pre-finished plywood works great here. Working with polyurathane glue is a bit harder than wood glue, since there is no "tack" to it, and it takes a few hours to dry. I re-enforced all the joints with 3/4" x 3/4" wood strips on the blind sides, which will act as supports for shims on the tops of cabinets and nailers for the trim on the bottoms.

Here is the front part of the upper corner cabinet:

I designed this cabinet to be only 10 inches deep on the sides instead of the standard 12. This changes the backs from 27 to 24.5 inches, allowing a full 48 inch wide window with trim. It also makes the back corner under the cabinet more visible.

This cabinet will hold a couple of "D" shaped lazy suzans that use almost the entire footprint.

Wednesday, October 11, 2006

Green Remodeling

Whenever possible, I try to incorporate Green actions into my remodeling.

Being from Oregon, we don't often associate politics with being environmental (discounting the extremists, etc.), we just think it's a good idea. I hope both political liberals and conservatives will practice "recycle, reuse, reduce". Many actions we can take are the simple or small ones, that ultimately add up.

Green elements of this kitchen remodel:


  • Reusing the cabinets doors - the boxes are terrible, but the doors are in great shape. If we did not reuse them, we would donate them to the Rebuilding Center (see below)
  • Adding 1 inch rigid foam insulation behind all cabinets - increases the R-value by 4.5, and adds one inch depth to the counter tops
  • Replacing the old aluminum windows with energy star (Lo-E) ones
  • We are keeping the soffits - insulating all of these
  • Adding 12 inches of cellulose insulation to the attic, once the lighting is complete
  • All the plywood I have bought is from Shur-way (see resources on the side bar). Beyond having really good prices and being very nice people, the materials are over-runs, slightly damaged, etc. If we buy these kinds of materials, they don't get land-filled.
  • Install Energy Star appliances where we can
  • And the biggest of all - we are recycling (remodeling) an older house

Once the kitchen is done, I have been considering adding solar to the house (it already has a passive design) to start that electric meter running backwards...

Resources:

Tuesday, October 10, 2006

Range Hood Module

Since I am building the range hood to match the cabinets, all we need to buy is the fan unit. I selected a Broan Power Module PM250, from NutoneSales.com (Nutone is a brand of Broan) for $90 + 12 for shipping.

The next best price I could find online was $130, and in-store for about $150.

It is a basic unit with 250 CFM, aluminum filters and a light. I read a TOH article on hoods, and they indicated that 250 should be fine for most applications, and if you get above 350 CFM, you can get other back-draft issues.

You can buy a mounting kit, but I decided to pass on it. The hood cabinet is custom anyway, so cutting the hole in the bottom to fit should not be a problem.

Here is a rendered image of how the hood cabinet will look: