My New Blog: TF Workshop

Saturday, April 28, 2007

Dimmable Fluorescent Bulbs

To help reduce energy consumption, we decided to give dimable flourescent bulbs a try in the kitchen.

Home Depot has them for $13 each, which is about $10 more than normal flood lights, but they consume a lot less power and supposedly last 8 years or more. These give the same amount of light as 65W incandecents, but only use 15W. With 10 recessed lights in the kitchen, we are looking at saving 300W (using dimmer) to 500W (full power).


How they compare: the light is whiter, even when dimmed. The dimming works fairly well. No buzzing, but they do take a second to come on. All in all, they are the right way to go. That being said, we are keeping 40W incandecents in the island pentants for now, to keep the light on the counter surface a bit warmer.

I am hoping that in the next few years, LED technology gets mature enough to provide an even better and greener alternative...

Sunday, April 22, 2007

Pendant Lights - $70

The pendant lights are from the Avalon set, made by Progress Lighting.

The online prices for these range widely, from $87 each on the progress site to $27 on Absolute Home. With shipping two lights cost about $63.

I needed to move the light to the new island position, using old-work light boxes, adding another $5.


Recessed Lighting - $180

I have some cost updating to do (hopefully not to much more...). The recessed lighting from Home Depot were $10 for the cans and $8 for the trim. I could not find anything on line for this price. There are 8 lights in the ceiling and 2 in the soffits, giving a total of $180.

The hardest part of installing these was cutting the holes from above and nailing the cans in between the trusses. The reason it was hard is that the roof pitch is 4:12, and access is pretty limited. I chose not to use the remodel cans, but the new-construction ones, since they are more forgiving if the hole cut in the sheetrack is not exactly right.


The units are HALO brand, made by Cooper Lighting. These are 5 inch IC - IC means they can come directly in contact with insulation. Since we have blown-in celulose, IC is by far the best option. Here is a cut-away view of the light cans.
Any negatives: yup - installing the trim is hard. It took me an hour to figure out how to get the first one in, then about 5 minutes per light afterwards. Getting the last spring wire to hook is pretty difficult without some sort of tool. I fould a set if curved needle-nose pliers makes it a lot easier. Unless I am really missing something on the install of these, prepare to have your fingers snapped a few times and a bit of frustration.

Pendant Lights and Pot Rack

Here are a couple of pictures of the pot rack and pendant lights installed. Below I detial out the steps on how to easily align these to the island.


Observe that the dog is just as interested in the new rack as I am...

How to hang a pot rack

Getting the lights and pot rack lined up to the island is not hard, it just takes a little bit of time. Here is what you need:

Initial set up:
  • I set the rack and lights on island, in the positions I wanted them to be on the ceiling.
  • Take time with this step. Make sure you have everything where you want it, and that everythnig is centered.
  • Have a someone else (my DW) look at it and verify its correct - saving lots of pain later on.
Marking the pain points on ceiling:
  • The two pendant lights make the "long axis" of the layout.
  • I put tape on the island and marked the center of the lights.
  • I used a plumb-bob to transfer the marks to the ceiling.
  • I checked the marks against the closest side wall, just to make sure things were OK. They were within 1/8" inch of each other, so there was no problem. I think anything 1/4" or less is not even worth adjusting for.
Laying out the ceiling:
  • I drove a nail at the two points I marked on the ceiling, and stretched a string tightly between them. This is the key step - since the string on the ceiling is a main line for the pot rack.
  • Once I figured out where I wanted the chains to go, I marked the positions on the ceiling along the line.
  • Using a square, I marked the positions from the line where the pot-rack bolts actually go.
  • The diagram gives the general idea:

  • One the marks were in place, I checked everything against the side wall to verify.
  • Note that I have put the pot rack chains going slightly outward in both directions. This helps stabilize it, and reduce the "swing set" effect. Once a few pans were put on it, it hardly moves at all.

Mounting the rack:

  • None of the places I wanted to put bolts had trusses.
  • Using toggle-bolts, etc. hoping that the ceiling sheetrock would be strong enough for the pot rack is nuts. Even if it did work today, it would come down at some point.
  • I drove nails through the ceiling where the bolts when, and when up in the attic and put some blocking in place. Pulling out insualtion and putting this in is a pit of a pain, but don't skip it.
  • Here is a fairly good article from Lowes on adding blocking for a rack: http://www.lowes.com/lowes/lkn?action=howTo&p=Build/hngpotrck.html

Adjusting the height:

  • I left the extra chain on for now. We are gonig to use the rack for a week to make sure it's at the right height, then cut the excess chain off.


More detail in my article library on eHow...

Friday, April 20, 2007

Island Pot Rack and Pendant Lights

I decided to change plans a bit and work on the pot rack and ceiling lighting instead of cabinets. We have a full Saturday and the weather is going to be cool, so I will be mounting the pot rack, pendant lights and can lights - lots of attic work. Its going to be relatively messy, so I want to get it all done in one shot. This is the last "big mess" thing we need to do.

Here is the assembled pot rack. Its made by Calphalon (link to orginal post). We bought the largest one they sell: 54" x 20".


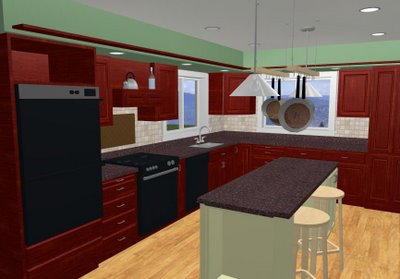
When I laid out the rack with the pendant lights on the island, they were a bit too close to each other.


The nice thing about this pot rack is that its somewhat adjustable. I took the center pieces out to cut the length by 12 inches - now its 44" long. I could have also taken the rounded ends off to get 36 inches. Considering the rack cost $100, I can take the peices out and still pay signficantly less than the smaller version would be retail. I am going to use the 12 inch sections I removed for small hook bars on either side of the cooktop.

A tip on assembly: put in all the screws finger tight, then use a wrench to tighten them all down. They are much easier to align if you do it this way.

Now the spacing is much better. We want as big of a rack as possible, but not have pans bump into the lights.


I did a bit of research on how high the lights and rack should be. There is of course the common sense approach, but I like to get an idea of what the designers say to do. Unfortunately, as in many cases, there is not a clear set of guidelines that I could find online. It seems like 90% or are just add sites with some sort of fluff paragraph about lighting.

Here is what I found:

  • Pendants should be 30" to 40" inches above the counter top
  • You should be able to see through the island to a person you are talking to. We are a family that ranges from 5'2" to 5'10", so we are going with 30".
  • Same for the pots hanging from the rack. A 20" long pan (includes handle) should be about 30 inches off the counter, but still reachable by the shortest person using the kitchen.
  • The compromise we cam to is to have the bottom of the rack hooks 14 inches from the ceiling. We will set it up with a bit longer chain, and check it tomorrow.

The pot rack is going to need to carry a lot of weight, so I will be putting some blocking in the attic to support the eye bolts for hanging it. I will take pictures of how I do it and post them.

[Link to photo set]


More detail in my article library on eHow...

Sunday, April 15, 2007

Post Mortem on the Kitchen Layout

At work, a post-mortem (literally: after death) is where we review what has been done and decide if the results are good. We also discuss what could have been done better. I get a number of searches leading to this blog about kitchen layout, so I thought I would do a similar follow-up. [Link to original post]

Here is the layout. I have numbered and rated the "zones" of the plan


Rating 1: Great - Main working area

  • 42" inches seems almost perfect.

  • It gives plenty of room for a person to work, plus allow other to circulate - or have two people work.

  • It allows easy movement no matter which appliacnce is open

  • A few inches more would be fine, but much more than that would make the island too far from the counter for easy use. If I had the extra space I wold have applied it elsewhere.

Rating 2: Great - End working area

  • Same as rating one for basically the same reasons.

  • The area by the sink and dishwasher is nice and open, so two people can unload, rinse, load, wash, etc.

  • Also, the cabinets in this area have deep pull-out shelves. There is plenty of space to have them out and still stand in front of them.

  • The pantry cabinet doors can stay open if needed

Rating 3: Good - Island dimesions, design

  • 90 inches is a great length

  • 30 inches works fine. 32" to 36" would be an improvement. More than about 42" seems like it would make reaching across difficult. I would not want a 24" wide island - it would seem too narrow. 28" seems like it would be the minimum.

  • My DW can work at the island and it still gives the kids enough room to do homework, etc.

Rating 4: Good - Refridgerator Location / Work Triangle

  • Even though it is somewhat farther than NKBA suggests, it still works fine. The travel does not seem excessive.

  • We get stuff out and set it on the island.

  • The door swing works fine in the 36" space. We have a side-by-side. If you had a single door, it might not work so well.

  • We have 4 kids, who seem to get in and out of the fridge every 5 minutes. Having it a the front (dining room) end of the kitchen works well.

Rating 5: OK - Area on the far side of the island

  • 36" is what we have, and its the minimum I would want. Would I make the island narrower to get this a bit wider? No. Would I give up any of this to have a wider island? No. It is a compromise, but it works.

  • There is room for you to walk by - 24 inches - when people are sitting at the stools.

  • Since this side of the kitchen is the pantry wall, it works. I would not do 36" inches if there wree cabinets there.

  • Its amazing what going from 36" on one side to 42" on the other will do. 6" seems like yards!

  • Overall, I am happy with the decision to do it this way. In a perfect word, the wall would be 4 to 6 inches over.

Rating 6: Great - Stools on Island

  • My DW insisted (strongly) that there would be seating at the island. It was critical to her to have a place for people to sit and interact with her as she cooks. My initial response was "I guess that would be OK" - my response now is "this is great". It is a key feature of the kitchen. All you DH's out there, I got lucky and listended on this one...

  • We have a 12" overhang with square saddle stools, and it is almost perfect. There is plenty of leg room. Two cabinets needed to have the depth shortened to 16 inches from 24 - its worth it.

  • There is 50" width for two stools (NKBA recommends 24" per seat) - works great.

  • Room for three would have been nice, but the appliance lift on the other side of the island needed 22.5" inches.

Island cabinet plan


Summary: We would go with this plan again.


Friday, April 13, 2007

Carved Molding from Outwater.com - $50

I am going to start building the range hood next week. The key pieces of this are the venting unit (previous post) and the decorative molding that will go across the front of the cabinetry. It is a harvest pattern carved in cherry. Here is a photo:


We ordered it from Outwater Architetural Products for $43 plus shipping, which gave a total of just over $50. We looked for a molding of this pattern for quite a while before we found it on Outwater. This company has a vast number of products, and will send you a catalog as thick as a metropolitan phonebook for free. The quality of the piece is really good, and they shipped it in a large box that ensured it would arrive safely.
Fifty bucks for a 3" x 24" molding is definately not cheap. It costs more that the rest of the cabinet materials for the hood combined, but I think it will really make the hood look nice. I am going to frame it in the front, and stain everything to match.

Thursday, April 12, 2007

On-line Cost Estimator

I found what I think is a useful tool on remodelingmyspace.com - its an online cost estimator. I took our kitchen floor plan and tested it, and it came up with $44,500. The initial cost estimate I came up with was about $50K using a couple of online sources, but they are generic. This tool allows you to specify your remodel with a modest level of detail.


Taking the $44K the estimator calcuated and adding in a full-wall tile backsplash, toe-kick drawers, pull-out shelves, tiole curtains, new windows, etc. - $50K seems pretty close to the mark.
I stumbled on to remodelingmyspace.com from the contest banner on another remodeling blog, and I now have it on mine (If I win anything, it goes to Compassion - see sidebar). I have not searched through the entire site yet, but what I have looked at seems to be good quality content.

Saturday, April 07, 2007

Installed Appliance Lift

The appliance lift works! It holds both the KitchenAid mixer and food processor.

Since we had a piece of granite left over from the island, my DW suggested we use it on the lift. The weight of the appliances and the granite is pretty significant, so I had to adjust the spring tension to the maximum (third position). For detials on buying one of these, see this former post.

I bonded the granite to 1/2" piece of plywood, to give it strength and so it could be screwed to the lift assembly. I also glued a thin strip of granite with a rounded edge to the front, to give a fully rounded radius. If you look at the edge in the picture, you can see this. I am going to put cherry wood strips around the sides and back to cover it. I mounted it before I put them on to determine how thick they could be.

There is room to put a pull-out shelf under the lift to hold the KitchenAid accessories. I am trying to decide if there is room above it for a shallow drawer or slot for a cutting board.

Friday, April 06, 2007

Island & Hutch - Antique Paint Technique

My DW completed the 1000-step painting technique on the island and hutch. OK, 1000 might be a bit of an exaggeration, but it was a lot of work - and it turned out great. Here is a picture of the assembled hutch:


The final process ended up being:
  • Sand
  • Prime
  • Caulk and fill (easier to see holes and seams when its primed)
  • Sand
  • Paint - 3 coats
  • Glaze
  • Seal with polycrylic
I'm glad she has the stamina for this. I would tint the primer and be done! Here is a close-up of the crown.

Here is the center section that is going to be a plate rack. We still need to paint the spindle.


Here is the end of island.


[Link to photo set]

Sunday, April 01, 2007

Comparing Current Work to Design Model

I realized I was taking a lot of detailed pictures of the kitchen, but not a of the whole room. For my own motivation, I like to compare acctual progress to the plan. Here is a picture of the model:


Here is the actual state of the kitchen. The area is a bit messy - we are in he misdt of painting, grouting, etc. All in all, I am pretty happy with the progress to plan.

The best part is my DW is getting close to having an improved cooking zone, although we have been eating well throughout the remodel.

Compassion

This post is not about working on the kitchen, but about kids in poverty. I got the bug to put a banner for an organization called Compassion on my blog.

Here are a quote from Bono of U2 on this: "God is in the slums, in the cardboard boxes where the poor play house. God is in the silence of a mother who has infected her child with a virus that will end both their lives. God is in the cries heard under the rubble of war. God is in the debris of wasted opportunity and lives, and God is with us if we are with them."

We have been donating to this cause for a number of years - they are legitimate and dedicated. Going forward, we are donating any revenue received from the Google Ads on this blog to Compassion.
My biggest fear is that I will focus too much on my own little world (in this case our kitchen), and miss the big, wild, terrifying, wonderful world that is out there.