My New Blog: TF Workshop

Showing posts with label Lighting. Show all posts

Monday, March 10, 2008

Resources #6 - The Lite House

At the beginning of our kitchen remodel, lighting was a bit of a mystery. How many lights? What spacing? What kind? I knew generally what was required from our last house, but I wanted something a little more concrete to make decisions. Unfortunately, many of the "resources" on the internet are add sites, or very general. TheLiteHouse site was a nice find...


It actually provides some ideas and technical discussion to help you make lighting decisions.

Sunday, February 10, 2008

Review #15 - Recessed Lighting Plan

Overall, the lighting plan worked out well. We decided to err on the side of possibly having one or two more lights than needed - and having a very well lit area.


In general, keeping the lights about 6 feet apart worked fine. They are closer together between the counter and the island, due to the layout of the arae. We needed to have two rows of them to light both work surfaces without casting shadows.

For recessed lighting, the rules of thumb here for an 8 foot ceiling:
- 5 inch lights
- 1 for about every 35 square feet
- On the edges, keep them about 1 foot back from the front of the work surfaces
- I would rather have more light fixtures at lower wattage. It may cost a bit more, but then the light is more even, and there are no shadows.

The two lights over the island make a huge difference with the pot rack. They light the island top, where the recessed lights would be blocked.

Sunday, January 06, 2008

Review #11 - Fluorescent Under-Cabinet Lights

We absolutely love the under-cabinet lights. They really improve the feel of the kitchen, and make working much more comfortable. Here are pictures of the effect of the lighting...


We chose to go with fluorescent because they are the most economical to install, take the least amount of electricity (the green option), and they puts off low amounts of heat. The halogen lights we looked at put off too much heat, and Xenon puck lights were not appealing (and cost more).

The average cost per fixture was about $25.

The arguments against fluorescent are the light is cold, and the fixtures hum - neither is true in our case. The GE Premium UCF Fixtures don't flicker when turning on or hum.

The light actually has a warm feeling, but we have warm colors with the travertine back splash and granite counter tops. This may be very different with other materials.

We would do this the same way again. Possibly in a few years when LED's are more mature, we will try them, since they are by far the most efficient lights made.

Monday, July 23, 2007

Toys in the Attic

Actually, we have no toys in our attic - only a bunch of cellulose insulation and lights that are in the wrong places. I spent all Saturday moving lights, installing new ones and patching the holes - yuck. Our house is a ranch style with a 4-12 pitch roof, so in some cases I had less than a foot and a half of head-room to work. Lucky I am only 5' 8", or I may still be stuck up there.

Technically, this is not in the "kitchen", but it's close - the built-in hutch backs up to it. Since I needed to move the dining room light (they did not center it in the middle of the room - go figure), I decided to get all the attic work done in one shot.

Now that I'm done complaining... the lights turned out well. Here is a picture of the accent lights I installed around the fireplace.


The lights shine down the stone and highlight it, which really improves the way it looks. There is one on the end (shown) that you see when you first come into the house, and there are two over the mantle to draw attention to the pictures set there.

These are 4" recessed cans with standard trim, which run about $25 each.

One of the nice features of the house is that the fireplace is in the center (click here for the details from when we rebuilt it). Frank Lloyd Wright referred to the fireplace as the "heart of the home", and often insisted that it be the main focal point of the house.

  • From an article on Wright's design: The fireplace hearth is the center of the house as Wright felt the hearth was the heart of the home and, indirectly, the family. This is not only the center of the home but of the family.

Here is a fairly good article on lighting, that may give you a few ideas.

Saturday, April 28, 2007

Dimmable Fluorescent Bulbs

To help reduce energy consumption, we decided to give dimable flourescent bulbs a try in the kitchen.

Home Depot has them for $13 each, which is about $10 more than normal flood lights, but they consume a lot less power and supposedly last 8 years or more. These give the same amount of light as 65W incandecents, but only use 15W. With 10 recessed lights in the kitchen, we are looking at saving 300W (using dimmer) to 500W (full power).


How they compare: the light is whiter, even when dimmed. The dimming works fairly well. No buzzing, but they do take a second to come on. All in all, they are the right way to go. That being said, we are keeping 40W incandecents in the island pentants for now, to keep the light on the counter surface a bit warmer.

I am hoping that in the next few years, LED technology gets mature enough to provide an even better and greener alternative...

Sunday, April 22, 2007

Pendant Lights - $70

The pendant lights are from the Avalon set, made by Progress Lighting.

The online prices for these range widely, from $87 each on the progress site to $27 on Absolute Home. With shipping two lights cost about $63.

I needed to move the light to the new island position, using old-work light boxes, adding another $5.


Recessed Lighting - $180

I have some cost updating to do (hopefully not to much more...). The recessed lighting from Home Depot were $10 for the cans and $8 for the trim. I could not find anything on line for this price. There are 8 lights in the ceiling and 2 in the soffits, giving a total of $180.

The hardest part of installing these was cutting the holes from above and nailing the cans in between the trusses. The reason it was hard is that the roof pitch is 4:12, and access is pretty limited. I chose not to use the remodel cans, but the new-construction ones, since they are more forgiving if the hole cut in the sheetrack is not exactly right.


The units are HALO brand, made by Cooper Lighting. These are 5 inch IC - IC means they can come directly in contact with insulation. Since we have blown-in celulose, IC is by far the best option. Here is a cut-away view of the light cans.
Any negatives: yup - installing the trim is hard. It took me an hour to figure out how to get the first one in, then about 5 minutes per light afterwards. Getting the last spring wire to hook is pretty difficult without some sort of tool. I fould a set if curved needle-nose pliers makes it a lot easier. Unless I am really missing something on the install of these, prepare to have your fingers snapped a few times and a bit of frustration.

Friday, April 20, 2007

Island Pot Rack and Pendant Lights

I decided to change plans a bit and work on the pot rack and ceiling lighting instead of cabinets. We have a full Saturday and the weather is going to be cool, so I will be mounting the pot rack, pendant lights and can lights - lots of attic work. Its going to be relatively messy, so I want to get it all done in one shot. This is the last "big mess" thing we need to do.

Here is the assembled pot rack. Its made by Calphalon (link to orginal post). We bought the largest one they sell: 54" x 20".


When I laid out the rack with the pendant lights on the island, they were a bit too close to each other.


The nice thing about this pot rack is that its somewhat adjustable. I took the center pieces out to cut the length by 12 inches - now its 44" long. I could have also taken the rounded ends off to get 36 inches. Considering the rack cost $100, I can take the peices out and still pay signficantly less than the smaller version would be retail. I am going to use the 12 inch sections I removed for small hook bars on either side of the cooktop.

A tip on assembly: put in all the screws finger tight, then use a wrench to tighten them all down. They are much easier to align if you do it this way.

Now the spacing is much better. We want as big of a rack as possible, but not have pans bump into the lights.


I did a bit of research on how high the lights and rack should be. There is of course the common sense approach, but I like to get an idea of what the designers say to do. Unfortunately, as in many cases, there is not a clear set of guidelines that I could find online. It seems like 90% or are just add sites with some sort of fluff paragraph about lighting.

Here is what I found:

  • Pendants should be 30" to 40" inches above the counter top
  • You should be able to see through the island to a person you are talking to. We are a family that ranges from 5'2" to 5'10", so we are going with 30".
  • Same for the pots hanging from the rack. A 20" long pan (includes handle) should be about 30 inches off the counter, but still reachable by the shortest person using the kitchen.
  • The compromise we cam to is to have the bottom of the rack hooks 14 inches from the ceiling. We will set it up with a bit longer chain, and check it tomorrow.

The pot rack is going to need to carry a lot of weight, so I will be putting some blocking in the attic to support the eye bolts for hanging it. I will take pictures of how I do it and post them.

[Link to photo set]


More detail in my article library on eHow...

Sunday, November 19, 2006

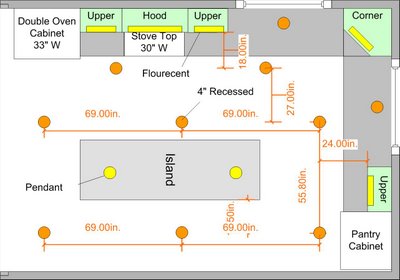
KItchen lighting plan

I finally decided on the lighting plan.

After looking at way too many web sites, I gathered enough information to put it together. I guess I could have just looked at a few kitchen pictures, but I wanted to create it from design rules. I found there are a lot of differing opinions on what those "rules" are.

Here is the plan using 5" recessed and T5 flourecents. (the 4" note should be 5")


These are the "rules" I came up with:

Recessed lighting:

  • Use 4" for task areas only - these are expensive and the trim options are limited
  • Use 5" for general lighting if the room is smaller in size or has less than 9 ft ceilings. We went with these.
  • Use 6" for larger rooms with higher ceilings
  • The size of the can does not indicated how much light you will get - the wattage of the bulb does.
  • In general, you need between 2.5 to 3 watts of light per square foot. Here is the math for our kitchen:

11 x 17 = 189 sq ft

189 sf * 2.75 watts per sf = 561 watts (between 2.5 and 3)

514 watts / 65 watt bulbs = 7.9 bulbs --> 8 lights in the ceiling

  • You should set up the parimeter lighting about 18 inches from the upper cabinets

Under cabinet:

  • Mount the lights close to front of the cabinet
  • Lots of options, went with flourecent due to heat of halogen or xenon