My New Blog: TF Workshop

Showing posts with label Granite. Show all posts

Wednesday, January 02, 2008

Review #10 - Granite Tile Counter Top

Our granite has been installed for about a year now, and we still really like it. I would do this again the same way, and we consider it a "must do" for the kitchen.

I installed it with polyurethane glue (Elmers) on a base of 3/4" birch / maple plywood, that had additional 3/4" pine support struts underneath. Once in place we use epoxy grout to seal the very thin (1/16" or less) joints. Everything has held solid - no cracking, shifting, etc. The grout has no stains and looks as good when installed (my DW cooks everyday).

While not being full slab, the tiles are large enough to only require a few joints. The island top shown is 90" long. I believe it's a good trade-off for doing granite at $25 per square foot. That being said, I don't think this is a project for a novice or new DIY'er. If you have a fair amount of experience with tile or masonry, it's not too bad.

Saturday, April 07, 2007

Installed Appliance Lift

The appliance lift works! It holds both the KitchenAid mixer and food processor.

Since we had a piece of granite left over from the island, my DW suggested we use it on the lift. The weight of the appliances and the granite is pretty significant, so I had to adjust the spring tension to the maximum (third position). For detials on buying one of these, see this former post.

I bonded the granite to 1/2" piece of plywood, to give it strength and so it could be screwed to the lift assembly. I also glued a thin strip of granite with a rounded edge to the front, to give a fully rounded radius. If you look at the edge in the picture, you can see this. I am going to put cherry wood strips around the sides and back to cover it. I mounted it before I put them on to determine how thick they could be.

There is room to put a pull-out shelf under the lift to hold the KitchenAid accessories. I am trying to decide if there is room above it for a shallow drawer or slot for a cutting board.

Saturday, March 31, 2007

Kitchen & Hutch - Paint & Details

I installed the granite edging yesterday and will grout it later on this evening. I bought another package of SpectraLock epoxy grout at Lowes last night. This picture shows the granite and the great paint job my DW did on the cabinets (more on paint at the bottom of this post).


I am really happy with the way the french country legs turned out with the beadboard. Notice that the legs don't go to the floor, but to the top of the base trim. We thought that this would look good and be easier to sweep around.

Here is the end of the hutch:

Here is the bottle rack on the island. I had an extra 5 inches available on the backside of the appliance-lift cabinet, and this seemed like a good idea.

Painting

Painting advice: buy good primer, paint, caulk, brushes and additives - and you will get a good job.

My DW bought Sherwin-Williams ProClassic waterborne latex acrylic paint, in semi-gloss. It seems to be really good paint. It flows nice, covers well and does not show brush marks. It is designed for interior cabinets, furnitre, etc.

She did three coats of this on top of the primer coat. Next she will do the the glaze finish.

For the third coat of paint, she added Floetrol paint additive. This makes the paint flow better and extends the drying time. This allows for the very smooth, brush-stroke free finish. By the way, this product is made by Flood, who also makes CFW for exterior wood - everything I have bought from this manufacturer has been very good quality and met my expectations.


Caulking

Once assembled, every joint and interface was caulked with GE latex / silicone caulk. Here is how I get a good caulking job (there have been many times in the past when this was not the case).

  • Lightly sand the surface
  • Wet the surface with a damp cloth
  • Apply a small bead of caulk (cut the tip small) - pushing the tube, not pulling
  • Smooth with my finger - get rid of the excess
  • Run a wet cloth lightly over it
  • Lightly sand again once dry

Thursday, March 22, 2007

Granite Top on the Island and Hutch

I installed the granite tops on the island and hutch. The poly glue worked so good last time, I did it again.


I scratched one of the large tiles with wet granite residue on the saw. I also ended up being one short, so I had to go get two more. $125 later, the tops were installed. Lesson learned: wipe of the bottom of the saw after each cut.


FYI: The blue tape is to cover the joints and keep them clean until I grout. I will cut and install the front pieces in the next few days


Updating cost:

  • Granite tiles: $1640
  • Total: $10,260

Saturday, February 03, 2007

Installing Granite - Part Six: Grouting - Done!


The granite installation is complete. It took longer than I wanted it to, mainly due to traveling and other family activites (skiing - yeah!). We grouted the joints using Spectra-Lock epoxy grout. As you can see in the photos, the joints are hardly noticable. We mixed 4 parts black with 1 part brown to match the stone color.

Here are my observations on using expoxy grout for the first time:

  • The instructions were very clear and straightforward.
  • Mixing the stuff is easy.
  • I had about 10 times what I needed for this counter-top, since there are very few joints. Next time (doing the island and hutch) I will mix a 1/3 or 1/4 batch.
  • It flows nicely. I used a small rubber float with no problems. Its more sticky than regular grout, which I think works to your advantage. (Note: I have grouted thousands of joints working in masonry - if you are new to this, it may be bit more challenging)
  • Clean-up was simple. You use water with a little bit of white vinegar, and the residue comes right off.
  • It takes a long time to dry. Its been in about 6 hours and is still slightly soft. Make sure to allow for over-night dry time.

Here is the corner - the location with the most joints:

Here is how I decided to do the under-mount sink with the tiles (the blue tape is to mask for the grout). We kept the tile back by the faucet to make a space for sponges / scrubbers without having them sit on the granite. We think this will keep the counter cleaner.

So, would we do these very large granite tiles again? Yes - for a total of $25 a square foot ($20 for the granite and about $5 for everything else) we are very happy with the quality of the counter top.

[Link to photo set]

Wednesday, January 31, 2007

Installing Granite - Part Five: The Front Edging

I am back in town, and I finished installing the front edge to the granite this weekend. I cut the pieces 1" wide with the tile saw, and put a small bevel on the edges. I used polyurathane glue to attach them, holding them in place with quick-grip clamps for 4 hours until the glue set.

If you do this, you should cut a few extra front pieces, I had 3 break - and I needed 13 total. The problem is that the granite has natural flaws, and cutting them this long and thin can expose some of them. Once glued on, its not an issue - the granite is hard and the wood support is strong.


The joints have not been grouted yet (this coming weekend...). I bought the Lacrete epoxy grout at Lowes, and am hoping the joints will be almost invisible.


Question: Does poly glue hold tile and stone? Here is a picture of the counter-top on the cabinets we installed in our master closet. These mosaic pieces of slate and ceramic tiles were glued in, then grouted. They have been solid as a rock for getting close to 2 years.

[Link to Photos]

Tuesday, January 16, 2007

Installing Granite - Part Four: Dodging Armageddon

In my last post, I detailed how Armageddon might start somewhere in our kitchen in the next day or so. To be brave and hold my ground, I ran to the airport and jumped on a plane to Germany. If the end of the world starts, I have 7000 miles of buffer, and my DW can handle it expertly.

Seriously, I checked the granite before I left yesterday, and it was rock solid, just like the other projects I have used it on. Unfortunately, I have to travel instead if installing the granite edging, and pieces around the sink. Once in, I will use SpectraLock expoxy grout. This stuff is supposed to be stain and water proof, which is a huge advantage in the kitchen. I will detail the process and results.

Monday, January 15, 2007

Installing Granite - Part Three: Negative Feedback

I have discovered that in many hobbies or interests, there are people who treat them like religions. This is definately the case for installing tile and granite...

I have received a few emails telling me that there is no way in the world you can install granite directly on to wood using polyurethane glue. If done, this will trigger Armageddon, starting right in my kitchen.

To this, I have the following responses (I think they are balanced, but who knows?)
  • The glue is rated for and designed to bond to stone and wood. I was a mason for a number of years - morter sticks to stone and so does this stuff. Also, I don't think a 25 pound granite piece is going to jump up at night and run away (my kids are a different story)
  • I did some testing for bond strength and it surpassed my expectations. If I am going to try soemthing new, best to do a small, cheap test to make sure it going to work OK. Once proven, push ahead.
  • I installed tile counter top in our closet with it, and that thing is going nowhere. Porcelain tile and slate mosaic - the thing is solid as a rock after over a year.
  • Why try anything new? I would much rather ride my horse to work... I think the spirit of posting on the internet is to share ideas, try new methods, etc.

OK, so much for my rant. To all of you out there developing new ideas - test your thoeries, go for it, and post the results. If the apocalypse does happen to occur at your house, make sure to post pictures - your blog hits will soar.

Saturday, January 13, 2007

Installing Granite - Part Two: Installing

Here are the steps for installing the granite...

Make sure the wood surface is totally flat. I used a block plane to make sure every bump and imperfection in the plywood was planed flat. I pay close attention to where pieces of plywood come together.

I built a small fixture to set the overhang of the granite. The granite is made of 1/2" plywood (the granite is 1/2"), with three peices of tape to add a slight additional thickness for the glue

Dry fit the tiles first, start in the corner and work out. With these large tiles, the best way to get a good corner is to do a miter as shown, and put an 18x18 in the corner.

Apply polyurethane glue in line 1" appart.

Install the tiles. The corner is the toughest, since you need to get the overhange right on both sides. This would be really hard to do with the fixture.

Once the tiles are in place, tape them together so they don't drift around as the glue foams and expands. Clamp the front across the joint to make sure everything is even.


Continue to install the tiles. I needed to slightly shim a few of them, since they are not exactly the same thickness everywhere. These had about a 1/16 variation. Since the glue foams up and expands to fill space, I could just shim the corners at the glue takes care of the rest.

If I needed to clamp the tiles in a back (a couple of spots), I put something heavy on them, like a 25 pound box of screws.

I kept the joints really tight, basically butting the tiles next to each other. The chamfer in the tiles will give a 1/16" joint, which will get filled with epoxy grout. The picture shows that the joints are already almost invisible, and once grouted will blend right in.

The glue needs to set for four hours - in this case overnight. Tomorrow I put the front lip on.

[Click here for photo set]

Installing Granite - Part One: Cutting

Well, I picked just about the coldest day this year in Portland to be outside running a tile wet-saw. I had to keep the water at a slow trickle to keep the saw from freezing. At least it wasn't raining...

Here is how I cut the granite:
  • I made a cutting board by attaching 1x2 pieces to a piece of OSB. These support the granite and allow for space for the saw blade. I also ran two strips along the bottom as support.

  • For these large pieces, I use a tile circular saw that has a water feed (link to info). I have a wet tile tablesaw, but it would be difficult to keep the tiles from binding

  • Put tape on the tile to see my marks. Tip, when you mark measurements, dont mark a line

  • Mark the tile at 4 inches off of where I want to cut to allow for the saw guide. Mark a "V", its much more accurate to align to

  • Clamp a piece of plywood as a straight-edge. On the marks


  • Cut tile with the saw, going pretty slow. Go real slow at the end of the cut, so you dont break the tile out.


  • Lightly sand the cut edge, using 220 grit, to remove the sharpness. Make sure the sander is at a steep angle, so you don't scratch the polished surface.

[Click here for photo set]

Starting the Granite Today

I am starting the granite counter tops today, using the large sections I bought. (See the Granite label on the sidebar for details). I will take pictures of the process - hope everything goes to plan...

Wednesday, November 29, 2006

Cost of Granite

We are hoping to install about 65 sq ft of granite counter for under $1500.

The tan-brown granite tiles are 26 1/2 by 18 inches and cost $20 a sf from Tile for Less. Total cost for 20 tiles was $1256.

Since the tiles come with 1/4 round-over, polished ends, we only needed to get the sink and island edges ground and polished. Crowley's Tile Edging did the work for $230, which I thought was really reasonable. It was $15 per foot for round edges and $10 for flat. The edging will end up looking like the the image below.


We will use epoxy grout, costing about $25.

Cost roll-up: $1510

Saturday, November 18, 2006

Granite layout, cutting, gluing, testing...

I needed to take a quick break from the cabinets to get a few cut pieces over to the fabricator to put finshed edges on them. These are for the drop-in sink and the island. Delivery time is about 3 days, and I would really like to have them before the Thanksgiving weekend.


Here is the granite layout plan:


I decided not to try to cut the large tiles on my tile saw - it's too risky. The granite between the blade and the fence would likely crack. At $66 a piece I really didn't want that to happen. I bought a 4" skill saw for tile from HD for $45 (Workforce THD250). The saw worked great - really clean cuts. I cut the sink pieces 1/4 large and then re-cut them on my tile table saw, to get them exact.

I am planning in using polyurathane glue to install the granite. I have used it on tile and slate, and it worked really well. I have installed a fair amount of tile and lots of brick and stone (used to work in masonry), so working with morter and thinset is not an issue. I want to bond the granite directly to the wood, so I dont have to add the 1/2 thickness needed for backerboard and two layers of morter. Also, the poly will bond the granite diretly to the undermount sink, and give good water proof seal. Finally, the poly has an "open time" of at least an hour, giving me the chance to make sure everything is exactly right.

So I did a couple of tests... I bought some cheap pink granite and setup prototypes (yup, I'm an engineer). I tested the bonding strength of granite to plywood and granite edging.


Both work excellent.

I spread the glue on about 1" lines on the plywood. This glue foams up, so it needs some place to go, or it will raise the tile. I let it dry about 8 hours. I broke off the granite edge with a hammer both in the upward and downward directions. In both cases it broke at the glue line - in other words, the glue bond is stronger than the granite itself.

For the edge glue, I tried to break it by hand - no go. I can't break it. I have done a lot of edge bonding like this with thinset - it breaks pretty easily. This is definately a superior bond. I am going to back-up the edge bonding with a piece 3/4 x 1 wood, glued in place.

I will bond the edging to the tile before install. This way I can get them exactly right, and not depend on the face of the cabinet to align them. If you notice a poor tile job, it often is due to the front edging not being quite right.

Friday, November 17, 2006

A plug for "Tile for Less"

I purchased the granite shown on my previous post from Tile for Less in Beaverton, Oregon.

I can't say enough good things about these guys. Their prices are reasonable, selection is good and service is great. They are willing to take time with you to discuss your project and help you think about various options. I wanted to switch some tile to a different color for accent - no problem (I can't imagine doing that at HD).

I dont know if the other stores (there are a number of them in the west) have this same level of service, but my guess is that they are worth looking into.

Here are some pictures of our bath we remodeled last year - we put 200 sq ft of porcelain tile in there.


Thursday, November 16, 2006

It's almost D-day

D is for demolition!

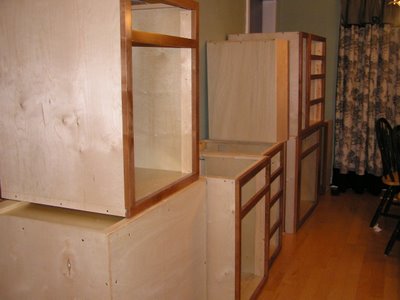
I have almost all the wall cabinets stacked up in the dining room, waiting to go in. I need to complete the pantry and double-oven cabinet.


I am taking next week off to try to get the old kitchen out and the main parts of the new one in. The plan is to finish all the cabinet details on Saturday, spend Sunday planning and running to HD for bits, and start full blast on Monday.

I am anticipating about 6 full days of work to get the old one out and the basic parts of the new one in, including windows and granite.

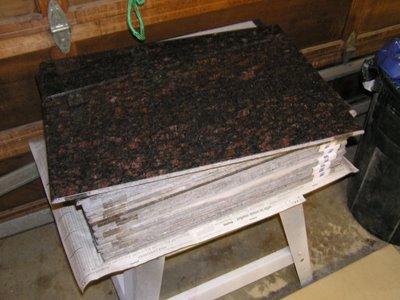
Here are the granite "tiles" I am using - its tan-brown:


These are large 18 wide by 26.5 deep, with 1/4 rounded front and back edges. They are made for counter installs, giving a minimum number of joints. I like these as a much cheaper option than slab granite, but with a lot less joints than 12x12 tiles. If I went with 12x12 with either a pre-fabricated front edge, or had the tiles edged, it still would come in at around $20 a sq ft. I am also planning to use epoxy grout, with is totally water and stain proof, and keep the joints to 1/8 inch.

I needed to buy 20 of them for a total of about 66 sq feet. The cost was $20 a square foot, which I think is a really reasonable total of $1325. I need to get a few edges rounded and polished by a local fabricator - he charges $14 a foot. I will put the total for the tile cost in the running cost update once get the fabrication done.

My only challenge is to figure out how to cut these. I have a mid-sized water saw for tile, which ought to work fine once I set up some sort of support for the 26 inch width.