My New Blog: TF Workshop

Showing posts with label Backsplash. Show all posts

Sunday, July 01, 2007

Travertine Backsplash #7 - Done!

We grouted the backsplash today, using a "slate gray" color to contrast the travetine. It shows the joints nicely without giving too much contrast.

We used epoxy grout (same as the granite counter tops). Its expensive - it took 4 "kits" at $20 each for $80 - but it is worth it. Having a fully stain-proof backsplash is a good long-term investment.

I don't really enjoy working with this stuff, since it sets up pretty fast with no way to wet it back down. The kits make a small amount, so it's doable. If you have not grouted before, I would not recommend starting with this. But if you do have experience, give it a shot. I would not do a kitchen area with anything else. Also, clean-up is pretty easy.

Here are some additional pictures...


We will seal all of this tomorrow and call it done. Was it worth all the effort? Yes.

The epoxy grout we used is Spectralock by Lactrite.

Travertine Backsplash #6

Here is a picture of the harlequin backsplash fully in place and taped up. It looks a little goofy now, but it turned out great.


Here is with the tape off, not yet grouted. We are very happy with the resutls...


To cut the diamond tiles correctly, you really need a holding fixture. It doesn't need to be fancy, it just needs to support the pieces well. I cut this out of a piece of scrap wood - it slides along the straight-edge on the sled.


A tradition we have : The "owner" always put our favorite piece in (the last one). Here is an action shot of my DW's hand at work.


Thursday, June 28, 2007

Travertine Backsplash #5

We started installing the diamond tiles into the focal point behind the stove. I haven't been able to spend a lot of time on it this week, so I am just adding a few vertical lines at a time.


I started with a vertical line down the center, and taped the tile in place. The yesterday I added a couple more lines on each side, and today the same. Here is a picture of them taped in place.

This is not the fastest method to get the tiles on the wall, but it is fairly easy, and allows me the chance to make sure everything stays aligned. Spacers and tape use in this fashion allow you the opportunity to adjust the tiles is needed. I will likely finish off the full-size tiles tomorrow, and do the cuts on Saturday.


If I tried to do it all at once, I think the movement would be tough to deal with. I would likey use a high-tack adhesive such as loctite power-grab

Here is my new favorite "tool": the tool bucket organizer by Husky Tools. It took me a couple of hours to get this thing organized, but I believe it saves me 20% of my time by not running back and forth to the garage. My youngest son bought it for me for my Birthday - a $16 very well spent. Also, it helps stop those frustrating episodes of me not being able to find a tool I need.


Monday, June 25, 2007

Travertine Backsplash #4

We installed the tile along the stove wall, as well as the rope molding that will frame the focal point of harlequin tiles. This post is mainly pictures...

We used the tile adhesive with rope molding, and held it in place with spacers and blue masking tape.


Here are a couple of photos once that tape was removed.


Sunday, June 24, 2007

Travertine Backsplash #3

I started installing the backsplash tile this morning. The eight hours of cutting this weekend is finally starting to pay off...


Here are a few of tips I use for setting the tile:
  • Put the tile on a board so it does not scratch the counter
  • In tight spaces I prefer to put the morter / adhesive on the tile, rather than on the wall. It is a lot cleaner.
These tiles are 1/2 thick with up to 1/8 variation, so I am using a 1/4 x 1/4 notched trowel. I set up the layout so that the outlet would end up even, and I would not have really small pieces along the windows.

Here is a picture of most of the wall laid up. I still need to cut a number of thin strips to go under the window sill.


Note that the outlet is stick out a bit farther than the tile. I discovered boxes that have adjustable depth, which work really well in this case. Here is end of the kitchen shot:


This is where I left off to go watch the Beavers - my alma-mater - hopefully win the college baseball world series. Go Beavs!

Saturday, June 23, 2007

Travertine Backsplash #2

Today I cut the brick pattern tiles, which are 3" x 6". Continuing on from yesterday, I cut the long pieces in 6x6 tiles, then cut them in half. Doing it this way helps keeps them square.


Here are some of tiles, showing both the lighter and darker patterns.

Here is a picture of the cutting fixture I made to create the pieces for the harlequin pattern behind the stove. The guide on the right goes over the fence to keep it straight as it moves back and forth. The piece at an angle, along with the c-clamp, sets up the cut. I will use this sled for various cuts during installation.


Here is the pattern laid out on a piece of plywood, with the rope tile framing it.


In total, I spent about 6 hours on the tile saw today, and 2 hours yesterday to make all these pieces. I bought the tile for 3.50 a sq ft. If I bought all of this pre-cut, the minimum price would be $15 a sf, and more likely around $20. All this adds up to about a $400 savings for 8 hours worth of work. This would have been a long haul if I didn't like doing it...

[Click here for full Photo Set]

Friday, June 22, 2007

Cutting Travertine for the Backsplash

I started cutting the travertine for the backsplash, (Click here for cost details). As you can see in the picture, it's pretty rustic.


The tiles are 18" x 18", but still cut fairly easily with the wet tile saw. I found that if I flipped the tile over and cut a couple of inches, then flipped it back and cut the rest of it, I didn't get break-out at the end of the cut (see picture below).


I cut the tiles into three 6" wide pieces (actually 5 7/8"). Tomorrow I will cut these pieces into the smaller tiles for the brick pattern.


Friday, June 08, 2007

Travertine for Backsplash - $240

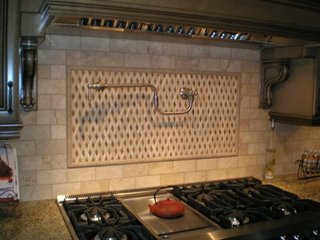
Here is the inspiration picture for our backsplash. It is from one one of the houses in last year's PDX Street of Dreams.


We decided on travertine instead of tile, because it has a more natural look. Home Depot had a special on a relatively rustic pattern, so we bought 3 boxes of the noche (brownish) and 1 of the ivory (lighter). These tiles are 18" x 18" and 1/2" thick.

Here is a picture of the travertine:

The cost is $3.50 per sq ft, totalling $130. We are going to cut these down into 3" x 6" pieces for a brick pattern, plus the diamonds for above the stove.

We are going to use the counter granite (tan brown) as the small accent pieces in the harlequin pattern. This is the concept drawing:


We brought bronze rope edging to frame this pattern to set it off. These were 6" long and $3 apiece. Twenty of them cost $60. The epoxy grout is going to be about $25, and the adhesive around $25 as well.

Total cost is about $240. If we were to buy the tiles pre-cut, we would be at $15 a sf or more, making the project top $750 in cost. So we will have about $500 for 3 hours of cutting on the tile saw.

Tuesday, August 08, 2006

Backsplash Design

We went to the Portland area Street of Dreams to tour the showcase homes and hopefully get some ideas. Most of the designs are much too "over the top" for us, but we found some great details we are going to use in our remodeling plans.

We found our backsplash inspiration: brick-pattern background with a basketweave design framed beind the stove. Our stove will not be as wide as this, but we should be able to properly scale it down.

We have not decided on the material yet - it will likely be travetine stone or Italian porcelian tile. To keep the cost down we will buy 12x12 tiles and cut them with a wet-saw. I have a 1 HP tile saw from Harbor Freight (link), which works great.

The pot-filler faucet will also be part of the design. This is part of our strategy, to add in high-end features (similar to the drawer slides we are using) to make the kitchen really stand out.


Tile saw