My New Blog: TF Workshop

Friday, December 19, 2008

Cooking for Christmas

My DW and daughter spent much of the week cooking all kinds of great food. I really liked the cookie plates (read display) they set up in the hutch. The food, colors and beadboard texture all go well together.


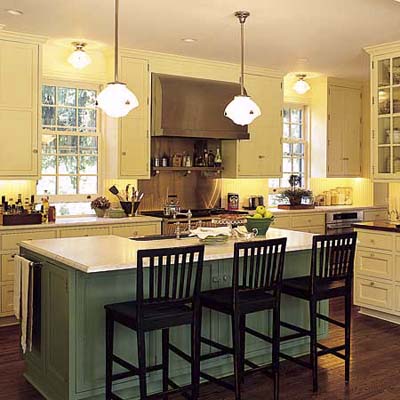
Here is a picture of a very busy kitchen, which is why we did the remodel...


Wishing all of you a Merry Christmas.


Thursday, November 27, 2008

Thanksgiving Treat: Skiing!

We are lucky enough to live 90 minutes from a year-round ski slope in Oregon, so my son and I took an early day off and went up for the morning. The snow field shown on the right side of picture sits at and elevation of 8500 feet.


What does this have to do with remodeling? Nothing at all - sometimes I need to take a break and have fun. This helps me remember all the good things I have, and how lucky I am to to have my family, my job, my friends, my faith...

I hope all of you out there have a great Thanksgiving, and get the chance to enjoy and appreciate all you have.

Saturday, November 22, 2008

Coffee Center

We have gone a little over a year without any additional projects in the kitchen. After staying in a vacation home that had a high-end built-in coffee maker, we decided to add one more.

We really liked the Miele coffee & espressp maker, but at $2400 or more, it's pretty much a budget-buster...


After doing some searching online, the cheapest built-in unit we could find was $1800. Free-standing units with the same features run $700 to $1500, so we decided to go with that option, hoping to spend less than $1000. My DW doesn't want it to sit on the kitchen counter, so we will build an in-wall coffee center. This will hold the machine, canisters for beans and cups, and it will pull out for easy access.

The only place available in the kitchen is on the wall outside the pantry as shown below. It can sit between the pantry door and the fridge, and push back into the pantry shelves.


Here is the concept picture...


I will need to move the display shelf up 4 to 6 inches and frame out a box. At present, I think the cabinet will be 18" high, sitting 36" off the ground. This will take up about one and a half of the pantry shelves on that wall, which really isn't that much.


I hope to build and install this over the Christmas to New Years holiday. If any of you readers have had a good or bad experience with automatic coffee & espresso makers, I would appreciate you leaving a comment. I am currently considering one made by Bosch...

Saturday, September 20, 2008

We broke the $1000 mark

We just past the point of earning $1000 from the Google Ads on this blog.


I don't actively manage the ads - I just let them run. Now that the kitchen remodel is complete, we get about 500 page reads and earn a few bucks a day.

As noted on the side bar, the money we earn is going to Compassion to help feed and educate children that live in difficult circumstances. We hope to be able to sponsor four additional kids with this money.


My hope is that people who benefit from the information on this blog will consider taking a bit of their savings and invest that in the human race, where ever they see fit.

Friday, May 16, 2008

Dimmable CFL - Disappointing Performance

We installed three Philips dimmable CFL bulbs in the kitchen about a year ago, wanting to see how the light and dimming function would work. They worked well for a while, but we had a 100% early failure rate. One burned out about 2 months ago, and the other two burned out in this past week.


The bulbs are supposed to last an average of 8000 hours. Assuming 8 hours a day use for a year (3000 hours), these should have lasted almost 3 years.

We have converted over to CFL in almost all of the fixtures our house, and I would have liked it if these were more robust. I think they provide a good solution to saving energy while allowing dimming.

I plan on taking the 3 bulbs into Home Depot tomorrow and asking for replacements and trying again. At $12 a piece, I am reluctant to just buy them, so its worth the hassle of possibly arguing with the return desk.

Saturday, May 03, 2008

Resource #9 - Fine Home Building

I think Fine Home Building magazine is a "must read" for those who want to improve their construction and remodeling skills. It is oriented mainly toward professionals and serious DIY people, with a focus toward technical content.


The magazine comes out every other month, with some additional special issues. It's not cheap, but I think well worth it, since I keep these as reference materials for future use. My favorite features are those dealing with design priciples and very detailed how-to articles. The publisher, Taunton Press, has a number of other high quality books on building and design.

The magazine's forum Breaktime, is a good spot to get advice from people with a lot of know-how. It is not the place where you ask "How do I fix a leaky faucet?" (save those for DIY Network) but where you might get input on using PEX vs copper for your plumbing system.

A point of note: I am not getting paid for blogging about any of these resources. These are the ones that I personally recommend, because they have been of good help to me. I believe they were well worth the time / cost to help me with the remodel.

Friday, March 28, 2008

Resources #8 - The Hammer Zone

Hammerzone.com is a great site for detailed information on DIY projects. I refered to a number of the articles here during the kitchen remodel.


The article that came in most handy was one on installing a garbage disposal. I could have figured it out on my own, but I would have likely made a couple of errors that I would then have to fix. The article provided me with a ton of detail and pictures, which allowed a "first time" install.

Here is an example of the level of detail the author provides...


If you need more detail than this, I suggest hiring a contractor for that phase of your project.

Finally, the web link page is fairly good. I did not look them all up, but a few of ones I did had good information.

Thursday, March 20, 2008

Resources #7 - This Old House Online

TOC has been a standard for me for number of years. I like the show, the magazine and the web site. They have created a very high quality site, with a number of photo galleries that can provide ideas.


For example, the photo below from the TOC site shows a lot about a kitchen island. You can see the green color, the overhang required for the stools, and how black stools go with the green. All these are basically incorporated into our design.


I don't expect the photos on the site to give the exact ideas, but help us gain ideas. You can sit down for a few hours and grab the photos you like. I use the freeware program Screenhunter to capture and gather images.

Monday, March 10, 2008

Resources #6 - The Lite House

At the beginning of our kitchen remodel, lighting was a bit of a mystery. How many lights? What spacing? What kind? I knew generally what was required from our last house, but I wanted something a little more concrete to make decisions. Unfortunately, many of the "resources" on the internet are add sites, or very general. TheLiteHouse site was a nice find...


It actually provides some ideas and technical discussion to help you make lighting decisions.

Sunday, March 02, 2008

Resources #5 - PDX Street of Dreams

Online resources and books can help out immensely with design ideas, but nothing compares to actually touring a few kitchens for the hands-on experience. The PDX Street of Dreams has been a great place for my DW and I to do just that.


The homes are very high end (and often over the top), but you can get a real sense of how various designs, materials and gadgets would work. One of our guidelines was to have a few high-end features in the kitchen, and this is the place to get exposed to them.

For instance, our back splash design came from this kitchen:


Here is ours...


Not exactly the same (wouldn't want that) but definitely a spin off.

We were willing to go with both painted and stained cabinetry, because we saw it here first - now it's obviously everywhere.

Now were working on our home theater, basing our design on pictures we too while on touring a number of them at PDX.

Resource #4 - Black & Decker Books

The best reference books I have found for remodeling are published by Black and Decker.


They are very comprehensive and contain a large number of step-by-stop photos. The plumbing and wiring books were particularly helpful. I found most of the ones I needed at the library, but ended up buying them to keep as reference guides.

Sunday, February 24, 2008

Resources #3 - NKBA.ORG

The National Kitchen and Bath Association web site has a number of good resources to help you plan your kitchen remodel.


They will send you a free workbook that has very good information on design guidelines. A summary of these, and additional information can be found at kitchens.com.

Friday, February 22, 2008

Resources #2 - Not So Big House

Before doing any remodeling, I suggest you read "The Not So Big House" by Sarah Susanka. Regardless of the size of the kitchen you want to remodel, understanding the concepts she outlines can really help you improve your overall design.

Almost every public library (at least the Portland ones) carries the book. I bought the Not So Big House Collection, which is comprised of two books.


Design decisions we made after reading the books:
- Putting an additional passage-way door in the dining room, so we could have a "long view" to the other end of the house (and then outside) from the kitchen
- Keeping the soffits and adding shelves to create a more "human scale" feeling and the edges of the kitchen
- Using a wider range of materials
- Taking the time to put pull-out shelves everywhere
- Keeping windows on two walls instead of adding more upper cabinets

Wednesday, February 13, 2008

Resources for Our Kitchen Remodel

I have purposely stayed away from a writing about other remodeling blogs. I really don't like blogs that either have minimal content or focus on repeating what others are writing about. These low content / high advertising sites are irritating.

That being said, I do think it's worth going over the online resources we used to complete our kitchen remodel. There a few that have really made the difference.

The best-of-the-best site for kitchen ideas is the Finished Kitchen Blog.


You can literally spend hours looking through all the kitchen photos posted there. My favorite feature of the site is the finished backsplashes slide show.

Monday, February 11, 2008

We were featured in the LA Times

Our blog was featured in the LA Times blog section called Pardon our Dust.

There was a nice little review of our work, which increased our visits by quite a bit.

Sunday, February 10, 2008

Review #15 - Recessed Lighting Plan

Overall, the lighting plan worked out well. We decided to err on the side of possibly having one or two more lights than needed - and having a very well lit area.


In general, keeping the lights about 6 feet apart worked fine. They are closer together between the counter and the island, due to the layout of the arae. We needed to have two rows of them to light both work surfaces without casting shadows.

For recessed lighting, the rules of thumb here for an 8 foot ceiling:
- 5 inch lights
- 1 for about every 35 square feet
- On the edges, keep them about 1 foot back from the front of the work surfaces
- I would rather have more light fixtures at lower wattage. It may cost a bit more, but then the light is more even, and there are no shadows.

The two lights over the island make a huge difference with the pot rack. They light the island top, where the recessed lights would be blocked.

Monday, January 28, 2008

Review #14 - Soffit Above the Kitchen Cabinets

This is somewhat of a controversial topic: Should you tear out the soffit in an older kitchen or leave it in? We left ours in and actually added to it for the additional cabinets. We added a display shelf to it, as shown in the picture:


Are we happy with the choice? Yes. The main reason is the display shelf idea we came up with. If it were just a plain soffit, I would have rather had cabinets that went all the way to the 8 foot ceiling. Here is a picture of it before shelf - not too exciting...


We did not have the problem that many people do: The soffit holds a large amount or electrical wiring or plumbing. Ours is basically hollow, so we were not "forced" to keep it in. It would have been straight forward to tear it out and patch the ceiling, but we wanted to keep it in the design.

Here is a picture of the section I added to go over the double-oven and bookshelf cabinet...


Why we like it:
- We don't think it looks dated in our kitchen with the added shelf. The shelf helps bring the edges of ceiling down, improving the feeling of scale.
- The shelf displays things much better than setting thme on top of the cabinets
- We don't have the "dust on top of the cabinets" problem

Thursday, January 17, 2008

Review #13 - Extra Deep Upper Cabinets

Our upper cabinets are an extra two inches deep (14") to allow for the normal 12" deep shelves, plus room for spice racks on the insides of the doors. While we generally like this design, there are some changes we would make if we did it again.


With the 12" shelves, we were able to put in lazy-susans, giving easy access to a lot more items. I needed to modify 14" shelves by cutting them back as shown.

This extra depth doesn't block any view of the back of the counter top or backsplash.


If I had it to do over again, I would have made the cabinets 15" to 16" deep. I could have put larger racks on the doors, giving a more space. I don't think this would be too deep to allow us to see to the back of the counter top.

Also, for the spice cabinet, my DW says she would have preferred a couple of pull-out spice racks, instead of the door racks and lazy-susans. At some point, I may go ahead and build these.


Saturday, January 12, 2008

Review #12 - Appliance Lift

We would rate the appliance lift as a "nice to have" item. This model is made by Rev-a-Shelf, and was purchased through Rockler for $100.

It has really been convenient for my DW, who cooks from scratch most of the time. She lifts it up, uses it, and drops it down. The pull-out shelf below holds the mixer and food processor attachments.

The shelf is 18 inches wide (cabinet opening is 22"), so it holds two applicances - a Kitchenaid mixer and food processor. It's not too heavy for my DW to lift up and down. Note that it is also covered with 1/2" granite to match the counter.

If you install one of these, make sure to put an outlet in the back of the cabinet - it's well worth the effort. The cords lay behind the shelf as you raise it, and simply stay out of the way.


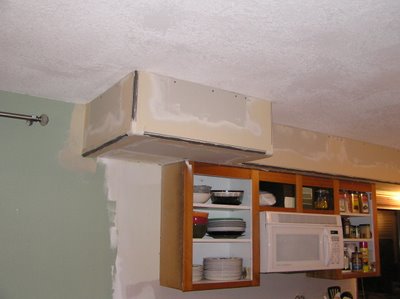
Here is a shot of the lift in the cabinet.

I would have made the cabinet shallower if I had to do it over again. I wanted to keep the cabinet to a minimum depth so the back side of it could be used effectively. The instructions indicated you need 23", so that's what I made it to. In reality, I could have gotten away with 18" deep and saved 5 inches. This would have allowed us to put another stool on the backside, instead we put a bottle rack. This is not a terrible result though, since we like the bottle rack. There is also room above the applicances for a cutting board slot, but we haven't put that in yet.

In review, it was worth the cost and effort to install it.

Sunday, January 06, 2008

Review #11 - Fluorescent Under-Cabinet Lights

We absolutely love the under-cabinet lights. They really improve the feel of the kitchen, and make working much more comfortable. Here are pictures of the effect of the lighting...


We chose to go with fluorescent because they are the most economical to install, take the least amount of electricity (the green option), and they puts off low amounts of heat. The halogen lights we looked at put off too much heat, and Xenon puck lights were not appealing (and cost more).

The average cost per fixture was about $25.

The arguments against fluorescent are the light is cold, and the fixtures hum - neither is true in our case. The GE Premium UCF Fixtures don't flicker when turning on or hum.

The light actually has a warm feeling, but we have warm colors with the travertine back splash and granite counter tops. This may be very different with other materials.

We would do this the same way again. Possibly in a few years when LED's are more mature, we will try them, since they are by far the most efficient lights made.

Wednesday, January 02, 2008

Review #10 - Granite Tile Counter Top

Our granite has been installed for about a year now, and we still really like it. I would do this again the same way, and we consider it a "must do" for the kitchen.

I installed it with polyurethane glue (Elmers) on a base of 3/4" birch / maple plywood, that had additional 3/4" pine support struts underneath. Once in place we use epoxy grout to seal the very thin (1/16" or less) joints. Everything has held solid - no cracking, shifting, etc. The grout has no stains and looks as good when installed (my DW cooks everyday).

While not being full slab, the tiles are large enough to only require a few joints. The island top shown is 90" long. I believe it's a good trade-off for doing granite at $25 per square foot. That being said, I don't think this is a project for a novice or new DIY'er. If you have a fair amount of experience with tile or masonry, it's not too bad.