My New Blog: TF Workshop

Showing posts with label Kitchen Island. Show all posts

Friday, April 20, 2007

Island Pot Rack and Pendant Lights

I decided to change plans a bit and work on the pot rack and ceiling lighting instead of cabinets. We have a full Saturday and the weather is going to be cool, so I will be mounting the pot rack, pendant lights and can lights - lots of attic work. Its going to be relatively messy, so I want to get it all done in one shot. This is the last "big mess" thing we need to do.

Here is the assembled pot rack. Its made by Calphalon (link to orginal post). We bought the largest one they sell: 54" x 20".


When I laid out the rack with the pendant lights on the island, they were a bit too close to each other.


The nice thing about this pot rack is that its somewhat adjustable. I took the center pieces out to cut the length by 12 inches - now its 44" long. I could have also taken the rounded ends off to get 36 inches. Considering the rack cost $100, I can take the peices out and still pay signficantly less than the smaller version would be retail. I am going to use the 12 inch sections I removed for small hook bars on either side of the cooktop.

A tip on assembly: put in all the screws finger tight, then use a wrench to tighten them all down. They are much easier to align if you do it this way.

Now the spacing is much better. We want as big of a rack as possible, but not have pans bump into the lights.


I did a bit of research on how high the lights and rack should be. There is of course the common sense approach, but I like to get an idea of what the designers say to do. Unfortunately, as in many cases, there is not a clear set of guidelines that I could find online. It seems like 90% or are just add sites with some sort of fluff paragraph about lighting.

Here is what I found:

  • Pendants should be 30" to 40" inches above the counter top
  • You should be able to see through the island to a person you are talking to. We are a family that ranges from 5'2" to 5'10", so we are going with 30".
  • Same for the pots hanging from the rack. A 20" long pan (includes handle) should be about 30 inches off the counter, but still reachable by the shortest person using the kitchen.
  • The compromise we cam to is to have the bottom of the rack hooks 14 inches from the ceiling. We will set it up with a bit longer chain, and check it tomorrow.

The pot rack is going to need to carry a lot of weight, so I will be putting some blocking in the attic to support the eye bolts for hanging it. I will take pictures of how I do it and post them.

[Link to photo set]


More detail in my article library on eHow...

Sunday, April 15, 2007

Post Mortem on the Kitchen Layout

At work, a post-mortem (literally: after death) is where we review what has been done and decide if the results are good. We also discuss what could have been done better. I get a number of searches leading to this blog about kitchen layout, so I thought I would do a similar follow-up. [Link to original post]

Here is the layout. I have numbered and rated the "zones" of the plan


Rating 1: Great - Main working area

  • 42" inches seems almost perfect.

  • It gives plenty of room for a person to work, plus allow other to circulate - or have two people work.

  • It allows easy movement no matter which appliacnce is open

  • A few inches more would be fine, but much more than that would make the island too far from the counter for easy use. If I had the extra space I wold have applied it elsewhere.

Rating 2: Great - End working area

  • Same as rating one for basically the same reasons.

  • The area by the sink and dishwasher is nice and open, so two people can unload, rinse, load, wash, etc.

  • Also, the cabinets in this area have deep pull-out shelves. There is plenty of space to have them out and still stand in front of them.

  • The pantry cabinet doors can stay open if needed

Rating 3: Good - Island dimesions, design

  • 90 inches is a great length

  • 30 inches works fine. 32" to 36" would be an improvement. More than about 42" seems like it would make reaching across difficult. I would not want a 24" wide island - it would seem too narrow. 28" seems like it would be the minimum.

  • My DW can work at the island and it still gives the kids enough room to do homework, etc.

Rating 4: Good - Refridgerator Location / Work Triangle

  • Even though it is somewhat farther than NKBA suggests, it still works fine. The travel does not seem excessive.

  • We get stuff out and set it on the island.

  • The door swing works fine in the 36" space. We have a side-by-side. If you had a single door, it might not work so well.

  • We have 4 kids, who seem to get in and out of the fridge every 5 minutes. Having it a the front (dining room) end of the kitchen works well.

Rating 5: OK - Area on the far side of the island

  • 36" is what we have, and its the minimum I would want. Would I make the island narrower to get this a bit wider? No. Would I give up any of this to have a wider island? No. It is a compromise, but it works.

  • There is room for you to walk by - 24 inches - when people are sitting at the stools.

  • Since this side of the kitchen is the pantry wall, it works. I would not do 36" inches if there wree cabinets there.

  • Its amazing what going from 36" on one side to 42" on the other will do. 6" seems like yards!

  • Overall, I am happy with the decision to do it this way. In a perfect word, the wall would be 4 to 6 inches over.

Rating 6: Great - Stools on Island

  • My DW insisted (strongly) that there would be seating at the island. It was critical to her to have a place for people to sit and interact with her as she cooks. My initial response was "I guess that would be OK" - my response now is "this is great". It is a key feature of the kitchen. All you DH's out there, I got lucky and listended on this one...

  • We have a 12" overhang with square saddle stools, and it is almost perfect. There is plenty of leg room. Two cabinets needed to have the depth shortened to 16 inches from 24 - its worth it.

  • There is 50" width for two stools (NKBA recommends 24" per seat) - works great.

  • Room for three would have been nice, but the appliance lift on the other side of the island needed 22.5" inches.

Island cabinet plan


Summary: We would go with this plan again.


Friday, April 06, 2007

Island & Hutch - Antique Paint Technique

My DW completed the 1000-step painting technique on the island and hutch. OK, 1000 might be a bit of an exaggeration, but it was a lot of work - and it turned out great. Here is a picture of the assembled hutch:


The final process ended up being:
  • Sand
  • Prime
  • Caulk and fill (easier to see holes and seams when its primed)
  • Sand
  • Paint - 3 coats
  • Glaze
  • Seal with polycrylic
I'm glad she has the stamina for this. I would tint the primer and be done! Here is a close-up of the crown.

Here is the center section that is going to be a plate rack. We still need to paint the spindle.


Here is the end of island.


[Link to photo set]

Wednesday, March 28, 2007

Kitchen Island Progress - Part 2

I complete the cabinet assembly: Installing the french country legs, base trim, caulking, sanding. We have part of it painted - hope to finish the base coats tomorrow.
Here is island before the base trim was installed:


Here it is after the base was installed and caulked. Once it's painted, I will install a final shoe molding. Here is a neat tutorial on www.easy2diy.com on how to do it.


I used poplar for the base, since it's pretty tough and takes paint really well. Here is the other end of the island. With the legs installed. The space at the floor is for the kickplate drawer


The next two pictures are of the hutch, which is the same design as the island. Tomorrow we will install the legs, base trim, crown molding, and get a couple of coats of paint on it.
The upper center cabinet will get dowel racks to hold plates.


Saturday, March 24, 2007

Beadboard Cost: $112

It took seven packages of beadboard to for the island and the hutch (still to be completed) at $16 each. We did not do a whole lot of searching for this - just went to HD and bought it. Each package is about 12 1/2 square feet.


He went with rustic pine - here is a picture:


Panelling would have been about 1/3 less cost and a bit less work, but would not have the feel we were looking for.

They also sold an MDF version that would have been pre-primed and easier to paint, but we have a NO MDF policy for the kitchen cabinets. MDF would be fine for the cabinets boxes, but not for the exteriors. If the it gets damaged, it does not look aged, it looks rotten. Pine beadboard can take a dent and look all the better for it. MDF will look fuzzy and cheap.

My DW, the painting guru, is taking it from here. Primer, 2 to 3 coats of base paint, a coat of antique glaze (darker color), and 1 to 2 coats of polycrylic on the heavy wear surfaces.

A tip for sanding:

  • You should always sand after the primer coat if you use water-based primer. It raises the soft part of the grain. You need to get this smoothed down for good resutls
  • A lot of people I talk to don't like the idea of sanding. My only advice is to learn to love it (not the sanding, but the results).
  • You can quickly do the surface with an orbital sander, palm sander or even a sanding block. Use 120 grit paper. Don't over-do it.
  • For beadboard, use a fine grit drywall sanding sponges with the sharp angle side. It easily gets into the beads. If you want the sponge to last, wrap a sheet of sandpaper around it, and use it that way.


Thursday, March 22, 2007

Granite Top on the Island and Hutch

I installed the granite tops on the island and hutch. The poly glue worked so good last time, I did it again.


I scratched one of the large tiles with wet granite residue on the saw. I also ended up being one short, so I had to go get two more. $125 later, the tops were installed. Lesson learned: wipe of the bottom of the saw after each cut.


FYI: The blue tape is to cover the joints and keep them clean until I grout. I will cut and install the front pieces in the next few days


Updating cost:

  • Granite tiles: $1640
  • Total: $10,260

Friday, March 16, 2007

Kitchen Island - Installation in Progress

Well, I spent the last month on the tablesaw and not on the keyboard. I had good intentions to take tons of photos and post every step - didn't happen.

The island has turned out great so far. I finshed building the cabinet boxes and main base. I set them in place and applied beadboard to the exposed surfaces. My DW primed everything while I was out of town and started to apply the base green color.


The dining room end of the island shown here has display / book shelves.

We spent quite a while playing with inches to get the maximum cabinets space, and also allow for seating. We can comfortably fit two stools in the 50" wide opening.

The other end cabinet is 23 inches deep for an appliance lift (see below). This gave us just enough space - 4.5 inches - to add a bottle rack to the back. It will fit wine bottle, but since we don't drink much, we'll have flavored syrup bottles displayed.

We put quite a number of outlets into the island. Since the wire is surface mounted, code requires it to be shielded by conduit. This flexible plastic option worked well. The cabinet with the lift and the center cabinet will have small appliances in them all the time. The in-cabinet outlets will keep the cords in order.

Here is the appliance lift harware. I need to build the shelf this weekend.


[Link to photo set]

Saturday, August 19, 2006

Change the Island and Hutch Color

After the street of dreams tour, we decided to change the color of the hutch and island to green - similar to below. We are also going to put mesh in the upper hutch cabinets.


Sunday, August 13, 2006

Applicance Lift for the Island

We are installing an appliance lift in the island - the design is in the previsous post. The one that gets the best reviewes by far is the Rev-A-Shelf 60lb lift. It basically takes a full cabinet, but we decided it was worth it.

We are putting a wider shelf on ours than is shown below, at 20 inches. This will allow us to both the kitchen-aid mixer and a food processor on it.

The best overall price for it is from Rockler at $95 direct from their local store, no shipping. I did find a couple of online ones for $90, but the shipping made them about $100. Besides, if I can just buy it, I will - if there is a problem I can return it easily.


Wednesday, August 09, 2006

Island Design

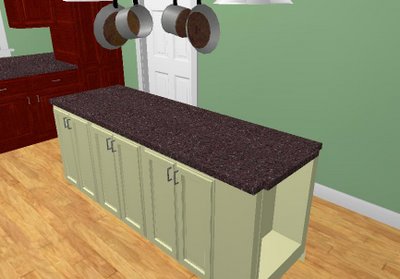
Here is the final island design...


Layout:

Rendered image:


Details:

  • 30 inches wide x 90 inches long
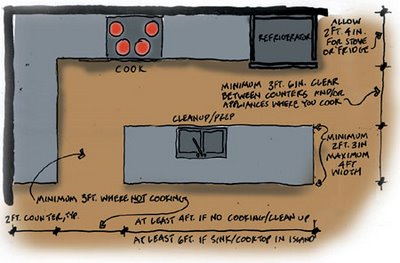
  • 42 inch clearance to counter with range, 36 inch clearance to the wall on the other side
  • Oak and alder wood, painted off-white and then glazed to antique
  • Bead board for the interiors, backs of cabinets
  • Spot for two stool
  • Applicance lift
  • All pull-shelves
  • Display shelf on the end toward the dining area

I used the following diagram for clearances. I found it posted on the Fine Homebuilding web site.

Saturday, August 05, 2006

Island legs - score!

I was in Rockler to look at their wooden on-lays, I noticed that some 29" country oak table legs were on clearance, and then 50% off the marked price. Instead of paying $25 each, I paid $8. I need 7 legs for the island and hutch design - so I paid $56 instead of $175. I am painting the island and the hutch, so the wood type is not that important, as long as it is hardwood.

I would have rather bought 34.5 inch legs for the island, but with the design I have in mind, I can use the 29" ones. The larger ones are about $50 each (best online price I could find).


I also got two 15 inch cherry legs for $2 each, which I will integrate into the sink cabinet design.

I try to get into the local rocker store (http://www.rockler.com) about once a month. They have non-advertised specials like this, and you have to go in to see what's available.

I did not find the on-lays I wanted...