My New Blog: TF Workshop

Showing posts with label Building Cabinets. Show all posts

Thursday, January 17, 2008

Review #13 - Extra Deep Upper Cabinets

Our upper cabinets are an extra two inches deep (14") to allow for the normal 12" deep shelves, plus room for spice racks on the insides of the doors. While we generally like this design, there are some changes we would make if we did it again.


With the 12" shelves, we were able to put in lazy-susans, giving easy access to a lot more items. I needed to modify 14" shelves by cutting them back as shown.

This extra depth doesn't block any view of the back of the counter top or backsplash.


If I had it to do over again, I would have made the cabinets 15" to 16" deep. I could have put larger racks on the doors, giving a more space. I don't think this would be too deep to allow us to see to the back of the counter top.

Also, for the spice cabinet, my DW says she would have preferred a couple of pull-out spice racks, instead of the door racks and lazy-susans. At some point, I may go ahead and build these.


Saturday, October 20, 2007

Review #2 - Pull out Shelves - Good Choice

I am going to rate adding pullout shelves a must-have as a feature, but good-choice for my design.


There is no way we would go back to regular shelves. It is amazing how much more convenient these are than regular ones, especially the lower ones. No more getting on my hands and knees to get the container for left-overs out. I notice we are all much more motivated to put the dishes way with these in place.

Review of the design:
  • Using laminated pine boards - really good. Once stained they have a nice warm color that goes well with the kitchen colors

  • Using butt-joint construction with poly glue and deck screws - great. I could have dadoed these, or even applied dovetails, but I don't think it would have added any needed strength. I did a test piece with just the poly glue on a clamped butt-joint. Once dry, when I broke it apart, it took wood with it, keeping the glue intact. Adding 2" deck screws to this, ensured it was going nowhere.

  • 3/8 pre-finshed plywood bottoms - great. The poly glues to the pre-finshed surface well, again taking wood away when break-tested. I glued the these into bottom rabbet joints, and used 1" crown staples to hold them in place (spaced about every 6 inches).

  • Full extension drawer slides - must have; no brainer.

  • Shelf width - I would have done this differently. I mounted the drawer slides the inside of the face frames and made the shelf widths to match (1 inch less then the opening). With 1/2 offset hinges on the cabinets doors, the shelves hit the doors and wouldn't slide out. I needed to adjust the hinges to the max outward position, giving a 5/8 offset - now the pave between the sets of double doors had a 1/2 gap. I decided rather than rebuild the drawers to be 1/2 less in width, I would put back strips between the doors. With a more rustic style, this looks fine - but if we had a modern style, it would be ugly. The fix was pretty minor over all. Lessoned learned: make sure you compensate for the shelf sliding past the drawer. the best case would have been to go with 5/8 offset hinges, and build the doors accordingly.
My favorite feature assocated with this is the pull-out toaster. In place for months now, and not a crumb to clean up in the morning. Note: for safety, I put a 20-gage piece of sheet metal on the bottom of the shelf above as a heat shield. It might be overkill, but $2 and 10 minutes work is worth it for the precaution.

Sunday, July 29, 2007

Building and Installing the Soffit Shelf

I fabricated the shelf that goes around the kitchen soffit. I glued and air-nailed 1/8 cherry plywood to a center core of 1/2 maple plywood. I left the center set back as shown to allow of it to mount to the strips I attached to the soffit.


Here are a couple of pictures of the strips. These are poly glued and air-nailed with 1.5 inch nails. I used a little marking fixture to mark the bottom of the strips all the way around before trying to mount them.


When I mounted the shelves on the strips (tapped it in place with a mallet), I had the unexpected result of having them stay up on their own. Once I put the 45 degree corner peice in place, it became very solid.

I had to basically build the corner piece in place, buy marking, cutting, then hand planing the pieces to fit. If everything were perfect, the piece would have 22.5 degree sides. In this case, they ended up being 21 on one site and 24.5 on the other. It takes a little while to get a good fit, but having tight joints is worth it.

Here are the shelves installed - I still need to put the front trim strip on, which will be dadoed to help provide good support, and allow me to blind nail it.

I have some cast iron 90 degree brackes I will put on top the shelves to reinforce them, and add some decoration.

Here is a picture of the kitchen - getting close to complete.


Sunday, June 17, 2007

Installing Cabinet Door Grills

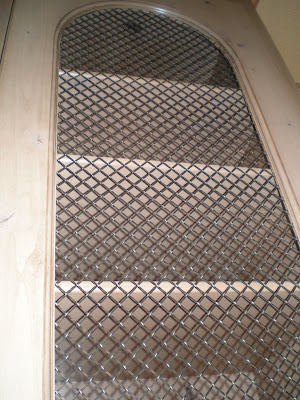
I was able to get the pewter grills cut and installed into the cabinet doors. Since the grill required for four small doors cost almost $100, I bought a good pair of compound wire cutters to do the job (shown in the picture below) - and they worked well.


The grill tends to fall apart at the edges when you cut it, with the smaller pieces flying off in random directions. Adding the masking tape to the perimeter fixed the problem. The small pieces that come out can be easily re-insterted. If I do it again, I will solder the corners.

The sharp edges of the grill make it bascially stay in place, but I used silicone caulk to hold it fast. The paint and batteries held the grill flat. We plan on putting glass behind these.


Here is the back side of the door. If you click on the image, you can see the caulking.

The final picture shows the top of the hutch, which turned out like we were hoping.


Click here for the details on buying the grill.

Wednesday, June 06, 2007

Toaster Setup in the Kitchen Island

One of the features I wanted for the kitchen was a pull-out toaster shelf. With four kids, there was regularly some sort of mess with the toaster at breakfast. The shelf is sized right for the toaster iteself and a couple of loaves of bread. As shown in the picture, we just pull it out and plug it in, without moving it at all. My DW put a tray down to keep the crumbs under control.


I really like the way the cherry stained drawer and shelves go with the green cabinets.

Here is a picture of the cabinet with the door closed. I still need to install the doors on the cabinets to the left.


I was able to get a low-profile pull-out under the applicance lift. It holds the mixer and blender accessories.


Monday, May 28, 2007

Building a Range Hood

The pictures below are of the range hood I built this afternoon. It has the fan unit in back (click here for details) and a 24 inch fluorescent light in the front. The fan unit comes with a light, but it's fairly small and 40W incandecent.


The hood is going to be 24 inches about the cook-top, so the bottom material needed to be non-combustible. I used air duct sheetmetal to cover the wood. I also made an inset box for the light to sit in. The seams in the box are sealed with gray high-temp silicone caulk. This was the first time I worked with metal like this, and it came out OK. It took the better part of three hours to just do what's shown here...

Here is the top side of the hood unit.


Once the fan unit was fully in, I put the the bottom trim and top mantle pieces on. The center part in the picture already had stain on it, so it's darker.


The final thing to do is stain and apply the carving to the front.

Sunday, May 27, 2007

Installing a Dish Rack

My DW finished painting the parts for the dish rack that's in the center of in the hutch, and I installed them. Here is a picture with the first plate inserted.


In most designs I looked at, the dowels were fixed, which would make cleaning difficult. I did find one at HD where they were removable, so I went with that.


It consists of upper and lower rails that hold the dowels. The top rails are about 1/4 inch thicker than the bottom ones, which allows you to slide the dowels in the top, then the bottom, and have them stay in place.

Using a Story-Stick on Cabinet Doors

When I need to do any sort of repetative work at all, I avoid using a ruler and instead use a story-stick. In this case, I needed to attach ten appliques to doors. This really helps me avoid making mistakes in measuring.


The first thing I do is cut a stick to the length of the object I am measuring against (here it's the cabinet door). Once I located the center of stick, I added marks for the top and bottom location of the applique. I also have marks on the back of the stick for side-to-side centering.

Why use this instead of a ruler?

  • No chance of getting wrong number on the ruler (unfortunately that's happened a lot)
  • I don't have to mark the door
  • I dont have to find the center of the applique
  • A ruler rolls up, the stick just stays there

Saturday, May 26, 2007

Continuing with Drawers and Doors...

We completed most of the drawer construction and painting today. It was a great day to be outside (at least in western Oregon). Here are all the pull-out shelves and drawers for the island and the hutch, just prior to staining. It took about an hour and a half to sand and assemble these - I wish things went as fast as they seem to on TV programs!


The wood appliques took paint pretty well. They are die-pressed plywood, so the edges needed quite a bit of sanding to get them smooth. I did ten of them with a sanding sponge in about 1/2 an hour - not a huge amount of work. The ones shown here have primer, 3 coats of paint, a coat of glaze and three coats of clear acrylic sealer.


They are ready to be mounted to the doors tomorrow. Here is how they should look.

Friday, May 25, 2007

Building More Drawers

I'm finally back to working on the kitchen, after about a month of doing just about everything but that. The pictures below show how I assemble the sides of the pullout shelves and drawers for the island.

I went for very simple construction: butt-joints glued with polyurethane and assembled with screws. I could have done dados or even dovetails, but I have found this method to be plenty strong.

I use a small drill press and a set-up board to pre-drill the holes:


A set-up board allows me to easily drill the same distance in, and marks on the set-up board give me the location to drill:


Here are the first drawer boxes assembled. I need to put the bottoms in tomorrow.


[Link to Photos]

Friday, April 13, 2007

Carved Molding from Outwater.com - $50

I am going to start building the range hood next week. The key pieces of this are the venting unit (previous post) and the decorative molding that will go across the front of the cabinetry. It is a harvest pattern carved in cherry. Here is a photo:


We ordered it from Outwater Architetural Products for $43 plus shipping, which gave a total of just over $50. We looked for a molding of this pattern for quite a while before we found it on Outwater. This company has a vast number of products, and will send you a catalog as thick as a metropolitan phonebook for free. The quality of the piece is really good, and they shipped it in a large box that ensured it would arrive safely.
Fifty bucks for a 3" x 24" molding is definately not cheap. It costs more that the rest of the cabinet materials for the hood combined, but I think it will really make the hood look nice. I am going to frame it in the front, and stain everything to match.

Saturday, April 07, 2007

Installed Appliance Lift

The appliance lift works! It holds both the KitchenAid mixer and food processor.

Since we had a piece of granite left over from the island, my DW suggested we use it on the lift. The weight of the appliances and the granite is pretty significant, so I had to adjust the spring tension to the maximum (third position). For detials on buying one of these, see this former post.

I bonded the granite to 1/2" piece of plywood, to give it strength and so it could be screwed to the lift assembly. I also glued a thin strip of granite with a rounded edge to the front, to give a fully rounded radius. If you look at the edge in the picture, you can see this. I am going to put cherry wood strips around the sides and back to cover it. I mounted it before I put them on to determine how thick they could be.

There is room to put a pull-out shelf under the lift to hold the KitchenAid accessories. I am trying to decide if there is room above it for a shallow drawer or slot for a cutting board.

Friday, April 06, 2007

Island & Hutch - Antique Paint Technique

My DW completed the 1000-step painting technique on the island and hutch. OK, 1000 might be a bit of an exaggeration, but it was a lot of work - and it turned out great. Here is a picture of the assembled hutch:


The final process ended up being:
  • Sand
  • Prime
  • Caulk and fill (easier to see holes and seams when its primed)
  • Sand
  • Paint - 3 coats
  • Glaze
  • Seal with polycrylic
I'm glad she has the stamina for this. I would tint the primer and be done! Here is a close-up of the crown.

Here is the center section that is going to be a plate rack. We still need to paint the spindle.


Here is the end of island.


[Link to photo set]

Thursday, March 29, 2007

Kitchen Island Progress - Sanding and Painting

I have discovered that there are three things that produce a good paint job on wood: priming, sanding, and never mess with drying paint (keep the wet edge). The biggest pain is sanding, but it also produces the best results - and my new toy for it is the Ryobi Corner Cat sander I bought at Home Depot for $30. Here is a picture:


Its a simple little one-speed sander that takes hook & loop pads. I allows me to get into most of the edges and tight places.

I found that I was spending more time and energy worrying about how much sanding I needed to do, rather than just doing it - so now I just do it. Normally, if I am painting, I sand 3 times: raw wood, after primer and after first coat. This seems to give the best results.
- Bare wood needs to be smoothed
- The grain raised by the primer needs to be taken down (water based primer)
- A small amount of grain seems to raise again with the first coat that should be taken down

My plug for Ryobi tools: they work well for home-owner use, don't cost a lot, and seem to be very reliable.

Wednesday, March 28, 2007

Kitchen Island Progress - Part 2

I complete the cabinet assembly: Installing the french country legs, base trim, caulking, sanding. We have part of it painted - hope to finish the base coats tomorrow.
Here is island before the base trim was installed:


Here it is after the base was installed and caulked. Once it's painted, I will install a final shoe molding. Here is a neat tutorial on www.easy2diy.com on how to do it.


I used poplar for the base, since it's pretty tough and takes paint really well. Here is the other end of the island. With the legs installed. The space at the floor is for the kickplate drawer


The next two pictures are of the hutch, which is the same design as the island. Tomorrow we will install the legs, base trim, crown molding, and get a couple of coats of paint on it.
The upper center cabinet will get dowel racks to hold plates.


Friday, March 16, 2007

Kitchen Island - Installation in Progress

Well, I spent the last month on the tablesaw and not on the keyboard. I had good intentions to take tons of photos and post every step - didn't happen.

The island has turned out great so far. I finshed building the cabinet boxes and main base. I set them in place and applied beadboard to the exposed surfaces. My DW primed everything while I was out of town and started to apply the base green color.


The dining room end of the island shown here has display / book shelves.

We spent quite a while playing with inches to get the maximum cabinets space, and also allow for seating. We can comfortably fit two stools in the 50" wide opening.

The other end cabinet is 23 inches deep for an appliance lift (see below). This gave us just enough space - 4.5 inches - to add a bottle rack to the back. It will fit wine bottle, but since we don't drink much, we'll have flavored syrup bottles displayed.

We put quite a number of outlets into the island. Since the wire is surface mounted, code requires it to be shielded by conduit. This flexible plastic option worked well. The cabinet with the lift and the center cabinet will have small appliances in them all the time. The in-cabinet outlets will keep the cords in order.

Here is the appliance lift harware. I need to build the shelf this weekend.


[Link to photo set]

Sunday, February 11, 2007

Pewter Grills for the Hutch

I am now starting to work on the kitchen island and the hutch. To give the hutch a farmhouse feel, we are putting grills in the cabinet doors. We got the idea from touring through the PDX Street of Dreams. Here is a picture.


Since most of the hardware in the kitchen is either brushed or antique nickle, we are going with pewter. Here is an image from the Rockler web site:


This stuff is not cheap. A 16" x 42" piece is $90 at Rockler. I did an online search for a similar product, and only found 1 at about 50% more. We are cutting this into 4 pieces, so the cost is reasonable.