My New Blog: TF Workshop

Wednesday, October 11, 2006

Green Remodeling

Whenever possible, I try to incorporate Green actions into my remodeling.

Being from Oregon, we don't often associate politics with being environmental (discounting the extremists, etc.), we just think it's a good idea. I hope both political liberals and conservatives will practice "recycle, reuse, reduce". Many actions we can take are the simple or small ones, that ultimately add up.

Green elements of this kitchen remodel:


  • Reusing the cabinets doors - the boxes are terrible, but the doors are in great shape. If we did not reuse them, we would donate them to the Rebuilding Center (see below)
  • Adding 1 inch rigid foam insulation behind all cabinets - increases the R-value by 4.5, and adds one inch depth to the counter tops
  • Replacing the old aluminum windows with energy star (Lo-E) ones
  • We are keeping the soffits - insulating all of these
  • Adding 12 inches of cellulose insulation to the attic, once the lighting is complete
  • All the plywood I have bought is from Shur-way (see resources on the side bar). Beyond having really good prices and being very nice people, the materials are over-runs, slightly damaged, etc. If we buy these kinds of materials, they don't get land-filled.
  • Install Energy Star appliances where we can
  • And the biggest of all - we are recycling (remodeling) an older house

Once the kitchen is done, I have been considering adding solar to the house (it already has a passive design) to start that electric meter running backwards...

Resources:

Tuesday, October 10, 2006

Range Hood Module

Since I am building the range hood to match the cabinets, all we need to buy is the fan unit. I selected a Broan Power Module PM250, from NutoneSales.com (Nutone is a brand of Broan) for $90 + 12 for shipping.

The next best price I could find online was $130, and in-store for about $150.

It is a basic unit with 250 CFM, aluminum filters and a light. I read a TOH article on hoods, and they indicated that 250 should be fine for most applications, and if you get above 350 CFM, you can get other back-draft issues.

You can buy a mounting kit, but I decided to pass on it. The hood cabinet is custom anyway, so cutting the hole in the bottom to fit should not be a problem.

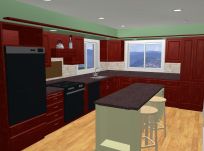
Here is a rendered image of how the hood cabinet will look:

Cabinets...

I think I will be doing a lot of posting on building the cabinets...

I completed assembling the uppers and bases, with the exception of the corner cabinets. Everything went together pretty easily - no problems. Once we get back into town, I should be able to get the corners, pantry and double-oven cabinets done in about 6 hours.

I have decided not to put the backs on cabinets (3/8" maple ply) until I have mounted all the drawer slides, etc. This should make that part of it simpler.

Saturday, October 07, 2006

Continuing with building the cabinets

One of my favorite things to do is woodworking in my garage on a cool fall day. It becomes perfect if can listen to an Oregon State football game and also spend some time talking with my kids about the things that are important to them. Today was pretty close to one of those days.

I got most of the plywood cut for the base cabinets, and I plan on assembling them tomorrow. I should be able to get all of them complete in just a few hours. The dadoed face-frames and 3/4" cleat for assembling the boxes allows everything to go together easily.

We are flying off to Disneyland on Tuesday, so all this work stuff will to go on hold again for a week or so. I am looking forward to just relaxing and having fun with the family.


Friday, October 06, 2006

Back at it

Life is what happens when you are planning what you are going to do next: Two trips out of town for work and getting sick put a temporary stop on the kitchen. I haven't been been able to work on the cabinets for a couple of weeks.

I am looking forward to this weekend. I want to at least get the cabinet boxes complete and the kick-plate drawer assemblies done.

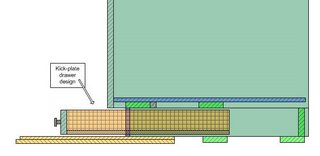
Here is the design for the kick-plate drawers. Basically, the structure will be 2x4 drawer bays with 3 inch drawers. The inset of the drawers will be only 2 inches under the cabinets - so that access will be easy. They will be almost 3 feet wide where possible, so we can store very long items.

Monday, September 25, 2006

Tools - One of my favorite subjects


I am not counting tools in the $10K total for the remodel. I figure anything additional I buy, I will use well beyond this project.

I have been "collecting" tools for about 20 years. I have a few expensive tools, but for the most part I buy economical ones. At the risk of offending the tools snobs out there, I rely on Harbor Freight Tools for a lot of of the small things I need. Their air tools have never let me down - and I have been using a simple little finsh nailer regularly for a number years. That being said, if I were back in the trades, I would buy the heavy duty tools - Dewalt, Senco, Ewing, ...

So here is my major tool list:

Saws

  • Tables Saw - 10" Craftsman professional series. The heart and soul of my shop.
  • Chop Saw - 10" Harbor Freight sliding compound miter. Has worked great for 5 years
  • Skill Saw- basic model - 2nd one so far
  • Reciprocating Saw - Ryobi
  • Saber Saw - Ryobi
  • Cordless Circular Saw - Ryobi
  • Japanese Pull Saws - Use these all the time for finish work - TopMan from Harbor Freight
  • Tile Saw - Harbor Freight 1HP professional series table model

Planers

  • 7 inch jointer - Harbor Frieght
  • 3 inch portable planer - Ryobi

Sanders

  • 5 in random orbit - Ryobi
  • Palm sanders - Harbor Frieght, Rigid
  • Belt Sander - Craftsman

Routers

  • 3/4 HP router - Craftsman
  • 2 HP industrial router / shaper - Craftsman
  • 1/2 little trim router - Harbor Freight - one of my favorite tools, since I can run it with one hand.

Drills

  • Corded - Dewalt 3/8" Professional Series.
  • Cordless - 18V Ryobi; 12V Craftsman
  • Table top drill press - Craftsman

Air Tools

  • Compressor - Husky - next to the table saw the most important tool
  • Finsh Nailers - Harbor Frieght
  • Staplers - 1/4 crown 18 gage - Harbor Freight. I ground down the tip of one from a flat to a 45 angle so I could get in really close on corners - indispensible
  • Coil Roofing Nailer - Harbor Frieght
  • Framing Nailer - 21 deg - Harbor Frieght
  • Latex paint sprayer - Husky - yes an air tool that sprays latex, looks like glass once applied
  • Low profile cut-off wheel - Harbor Freight

Misc

  • Shop Vac - Ridgid
  • Bench Grinder - Ryobi - this is another high-value tool, since it keeps stuff sharp.
  • Lots (OK, too many) hand tools: hammers, crow bars, chisels - various.
  • Clamps - Quick Grip are the best by far, don't skimp here.
  • 1/2 heavy duty industrial drill for mixing morter, grout, concrete - Dewalt
  • Biscuit Joiner - I really dont use this very much
  • Basic electrical, plumbing, sheetrock, masonry tools
  • Laser level - works great for laying out floors, etc.
  • Automotive sissor jack - great for making things fit when they dont want to.

Custom Tools - ones I fabricated

  • 3' x 5' work bench.
  • Cutting sleds for the table saw - use this all the time, especially for large lots or repeative cuts
  • Wooden squares that can be clamped as guides for saws, routers, etc.
  • Special straight-edge for laying out and pre-shimming doors - saves a lot of time
  • A busted screwdriver ground down to a sharp tip, used as an awl, punch, drill pilot, etc. This takes the place of a real sharp pencil in many cases
  • Short saw horses that we use for painting, setting up low tables using planks. Well worth the time to make these.

Saturday, September 23, 2006

Pot Rack

We decided on a black anodized pot rack by Calphalon. It should match the other black items in the kitchen nicely (appilances, sink, desk).We found the rack on Amazon for $100, shipping included. The next best deal we could find was $140, plus shipping. In store prices were $160 to $200. I am amazed as how much cheaper it is. I will definately look at Amazon when buying other small stuff for the kitchen.

The dimensions are 56 long / 20 inches wide. The island is going to be 30 x 90. This will give enough space for pendant lights on each end. The pans should not hang outside the width of the island either - so no banged heads.

A pot rack over an island can create a "partition effect". I have read this, and experienced in in our last house. We are going to hand this one as high as possible to compensate for that.

Building Cabinets

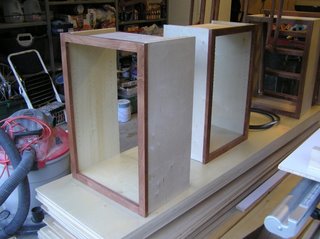
I finally started assembling the cabinets today, working on the uppers. Uppers require the most care - they are at eye level, so everything needs to look really sharp, including the interiors.

We decided to make them 13.5 inches deep instead of 12. This will allow for both a 3 inch spice rack on the doors and a 10 inch lazy susan or pull out system. This is also what we estimated the max depth could be and allow my DW to be able to clearly see under them.

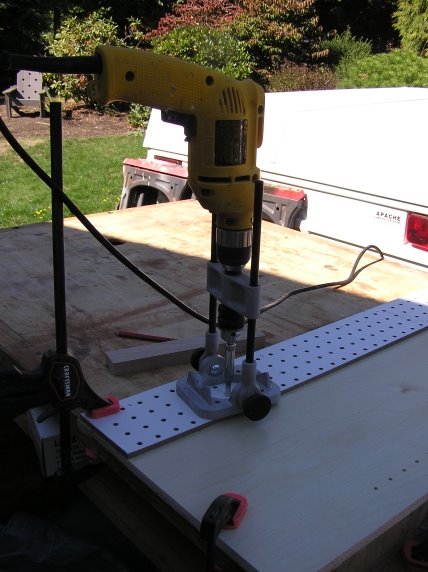
I needed to drill lots of little holes for the adjustable shelves (all the lowers will have pull-out shelves). I like to have them every inch, to allow for fine adjustment. I have done this on a drill press before with each hole marked, but it was a lot of work.

I put together the template system below, and I can drill all the holes in a cabinet side in about 3 minutes. The template is a piece of melamine-covered pegboard with a plywood straight-edge attached to it . I have self-centering bit and a drill aligner set up - almost impossible to go wrong.


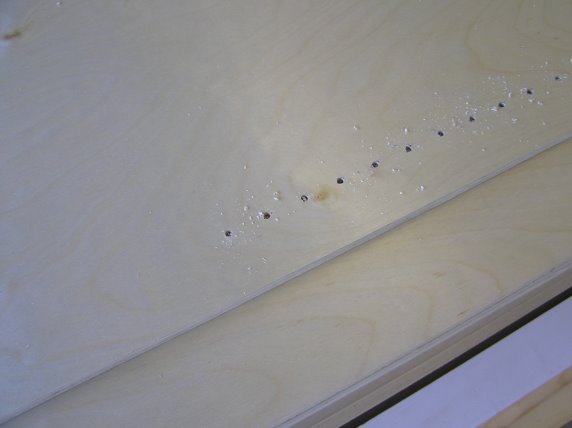
Here are the holes...


Here are a couple of the cabinets assembled. The are held together with glue and nails I shoot in with my air nailers - 1/4 crown staples that are 3/4 long to attach the boxes. 1 inch long ones to connect the sides to the tops and bottoms.

I still need to attach the backs. I will do that with the same staples and poly glue. I will put 3 inch wide ledgers in the tops of the backs, just to ensure I have solid structure for attaching them to the walls. Theses will go in with screws.

This has ended up being quite a bit of effort. But I am getting custom cabinets for $2K instead of $12 to $15K - and I enjoy the work.

Friday, September 22, 2006

Kitchen Floor Plan

I have uploaded the final kitchen floor plan.

The most difficult part of the final plan was the size and exact location of the island.
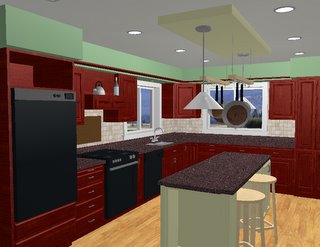
We finally settled on a 30 in wide design. It allows 36 inches on the wall side, 42 inches on the cabinet sides, and enough room to open the in-wall fridge and still have good passage. We should be able to ahve the double-oven, fridge and dishwasher all wide open and still be able to reasonable move around the kitchen.

Monday, September 18, 2006

Houseblogs.net

I just added this blog's RSS feed to houseblogs. net.


There are a number of interesting blogs listed there - all about building and remodeling homes.

Saturday, September 09, 2006

Granite Sink

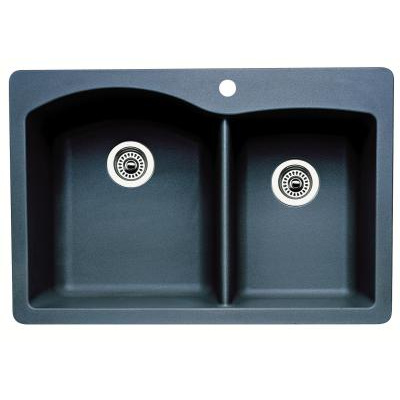
We decided on a black granite sink from Home Depot for $280. Its made by Blanco and sold under the name Pegasus - I think its an HD-only offering.
We are going with a "tan brown" granite counter top. It should pick up the dark tones well.


Cabinet Stain

I had a lot of trouble getting the Minwax stain to match the cabinet doors. I bought about 4 quarts in an attempt to mix the right color, but I couldn't get it work.

I went the Sherwin-Williams Paints, and they did a great job matching the color of the door to a stain for he face-frame wood. A quart of custom matched stain is $35 and a gallon is $65, so I went for the gallon. The matching fee ends up being about $35, which is well worth it.

By the time I did my own experimenting and bought the stain, plus the polycrylic coating, I am into to for about $100.