My New Blog: TF Workshop

Monday, January 28, 2008

Review #14 - Soffit Above the Kitchen Cabinets

This is somewhat of a controversial topic: Should you tear out the soffit in an older kitchen or leave it in? We left ours in and actually added to it for the additional cabinets. We added a display shelf to it, as shown in the picture:


Are we happy with the choice? Yes. The main reason is the display shelf idea we came up with. If it were just a plain soffit, I would have rather had cabinets that went all the way to the 8 foot ceiling. Here is a picture of it before shelf - not too exciting...


We did not have the problem that many people do: The soffit holds a large amount or electrical wiring or plumbing. Ours is basically hollow, so we were not "forced" to keep it in. It would have been straight forward to tear it out and patch the ceiling, but we wanted to keep it in the design.

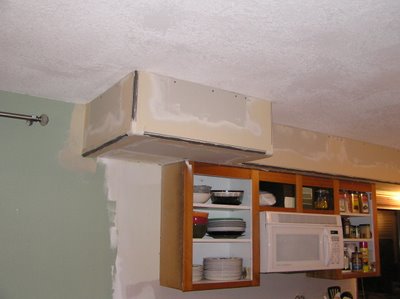
Here is a picture of the section I added to go over the double-oven and bookshelf cabinet...


Why we like it:
- We don't think it looks dated in our kitchen with the added shelf. The shelf helps bring the edges of ceiling down, improving the feeling of scale.
- The shelf displays things much better than setting thme on top of the cabinets
- We don't have the "dust on top of the cabinets" problem

Thursday, January 17, 2008

Review #13 - Extra Deep Upper Cabinets

Our upper cabinets are an extra two inches deep (14") to allow for the normal 12" deep shelves, plus room for spice racks on the insides of the doors. While we generally like this design, there are some changes we would make if we did it again.


With the 12" shelves, we were able to put in lazy-susans, giving easy access to a lot more items. I needed to modify 14" shelves by cutting them back as shown.

This extra depth doesn't block any view of the back of the counter top or backsplash.


If I had it to do over again, I would have made the cabinets 15" to 16" deep. I could have put larger racks on the doors, giving a more space. I don't think this would be too deep to allow us to see to the back of the counter top.

Also, for the spice cabinet, my DW says she would have preferred a couple of pull-out spice racks, instead of the door racks and lazy-susans. At some point, I may go ahead and build these.


Saturday, January 12, 2008

Review #12 - Appliance Lift

We would rate the appliance lift as a "nice to have" item. This model is made by Rev-a-Shelf, and was purchased through Rockler for $100.

It has really been convenient for my DW, who cooks from scratch most of the time. She lifts it up, uses it, and drops it down. The pull-out shelf below holds the mixer and food processor attachments.

The shelf is 18 inches wide (cabinet opening is 22"), so it holds two applicances - a Kitchenaid mixer and food processor. It's not too heavy for my DW to lift up and down. Note that it is also covered with 1/2" granite to match the counter.

If you install one of these, make sure to put an outlet in the back of the cabinet - it's well worth the effort. The cords lay behind the shelf as you raise it, and simply stay out of the way.


Here is a shot of the lift in the cabinet.

I would have made the cabinet shallower if I had to do it over again. I wanted to keep the cabinet to a minimum depth so the back side of it could be used effectively. The instructions indicated you need 23", so that's what I made it to. In reality, I could have gotten away with 18" deep and saved 5 inches. This would have allowed us to put another stool on the backside, instead we put a bottle rack. This is not a terrible result though, since we like the bottle rack. There is also room above the applicances for a cutting board slot, but we haven't put that in yet.

In review, it was worth the cost and effort to install it.

Sunday, January 06, 2008

Review #11 - Fluorescent Under-Cabinet Lights

We absolutely love the under-cabinet lights. They really improve the feel of the kitchen, and make working much more comfortable. Here are pictures of the effect of the lighting...


We chose to go with fluorescent because they are the most economical to install, take the least amount of electricity (the green option), and they puts off low amounts of heat. The halogen lights we looked at put off too much heat, and Xenon puck lights were not appealing (and cost more).

The average cost per fixture was about $25.

The arguments against fluorescent are the light is cold, and the fixtures hum - neither is true in our case. The GE Premium UCF Fixtures don't flicker when turning on or hum.

The light actually has a warm feeling, but we have warm colors with the travertine back splash and granite counter tops. This may be very different with other materials.

We would do this the same way again. Possibly in a few years when LED's are more mature, we will try them, since they are by far the most efficient lights made.

Wednesday, January 02, 2008

Review #10 - Granite Tile Counter Top

Our granite has been installed for about a year now, and we still really like it. I would do this again the same way, and we consider it a "must do" for the kitchen.

I installed it with polyurethane glue (Elmers) on a base of 3/4" birch / maple plywood, that had additional 3/4" pine support struts underneath. Once in place we use epoxy grout to seal the very thin (1/16" or less) joints. Everything has held solid - no cracking, shifting, etc. The grout has no stains and looks as good when installed (my DW cooks everyday).

While not being full slab, the tiles are large enough to only require a few joints. The island top shown is 90" long. I believe it's a good trade-off for doing granite at $25 per square foot. That being said, I don't think this is a project for a novice or new DIY'er. If you have a fair amount of experience with tile or masonry, it's not too bad.